Oracle RAC数据库安装实施文档
一 数据库RAC安装规划
1.1. 集群节点及实例
| 节点名称 | 实例名称 | 数据库名称 | RAM | OS |
|---|---|---|---|---|
| node1 | orcl1 | orcl | 16G | RHEL 6.9 64bit |
| node2 | orcl2 | orcl | 16G | RHEL 6.9 64bit |
1.2. 网络配置
| 标识 | 名称 | 类型 | IP地址 | 解析 |
|---|---|---|---|---|
| node1 Public | node1 | public | 172.16.2.1 | /etc/hosts |
| node1 private | node1-priv | private | 192.168.1.1 | /etc/hosts |
| node1 VIP | node1-vip | Virtual | 172.16.2.11 | /etc/hosts |
| node2 Public | node2 | public | 172.16.2.2 | /etc/hosts |
| node2 private | node2-priv | private | 192.168.1.2 | /etc/hosts |
| node2 Vip | node2-vip | Virtual | 172.16.2.12 | /etc/hosts |
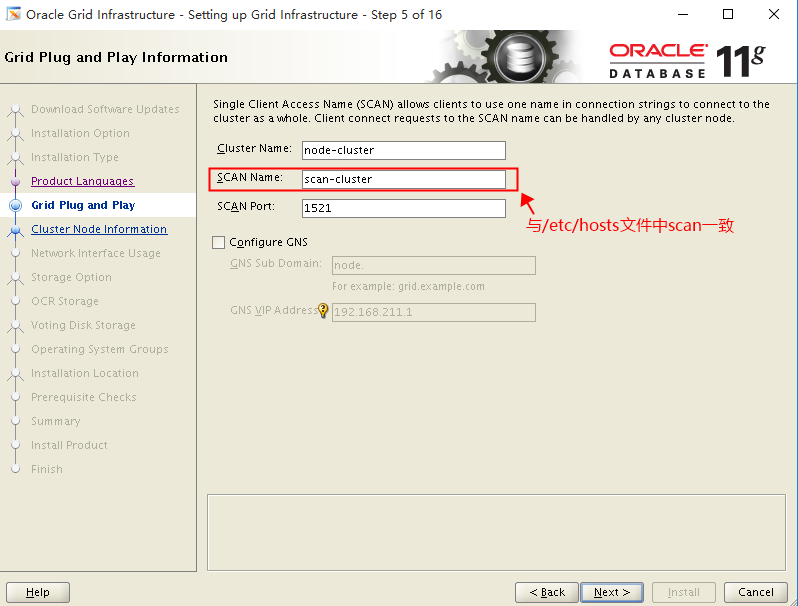
| Scan vip | scan-cluster | Virtual | 172.16.2.13 | /etc/hosts |
1.3. Oracle软件部分
| Software Companetns | Grid Infrstructure | Oracle RAC |
|---|---|---|
| 操作系统用户 | grid | Oracle |
| 主要属组 | oinstall | oinstall |
| 辅助属组 | dba | dba |
| Home目录 | /home/grid | /home/oracle |
| Oracle Base | /u01/app/grid | /u01/app/oracle |
| Oracle Home | /u01/app/11.2.0/grid | /u01/app/oracle/product/11.2.0/db_1 |
| 软件版本 | Oracle 11.2.0.4 |
1.4. 用户组规划
| GroupName | Group ID | 说明 | HOST |
|---|---|---|---|
| oinstall | 2001 | Oracle清单和软件所有者 | node1 node2 |
| dba | 2002 | 数据库管理员 |
1.5. 用户规划
| UserID | PrimaryGroup | Group | 说明 | HOST | 默认口令 |
|---|---|---|---|---|---|
| 2001 | grid | oinstall dba | Oracle Cluster用户 | node1 node2 | oracle |
| 2002 | oracle | oinstall dba | Oracle数据管理员 | node1 node2 | oracle |
1.6. 存储规划
存储建议采用RAID 10的存储方式。
| 存储项 | 文件系统 | 大小 | ASM磁盘组 | 冗余方式 |
|---|---|---|---|---|
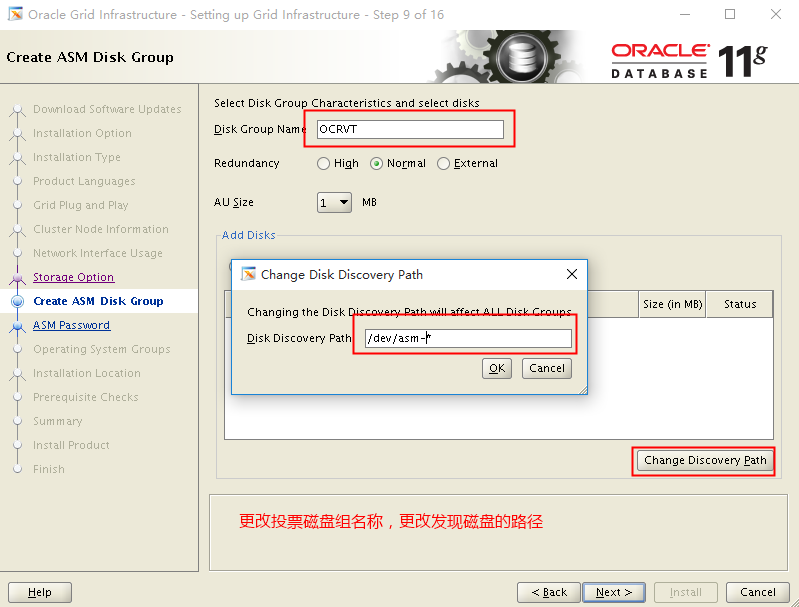
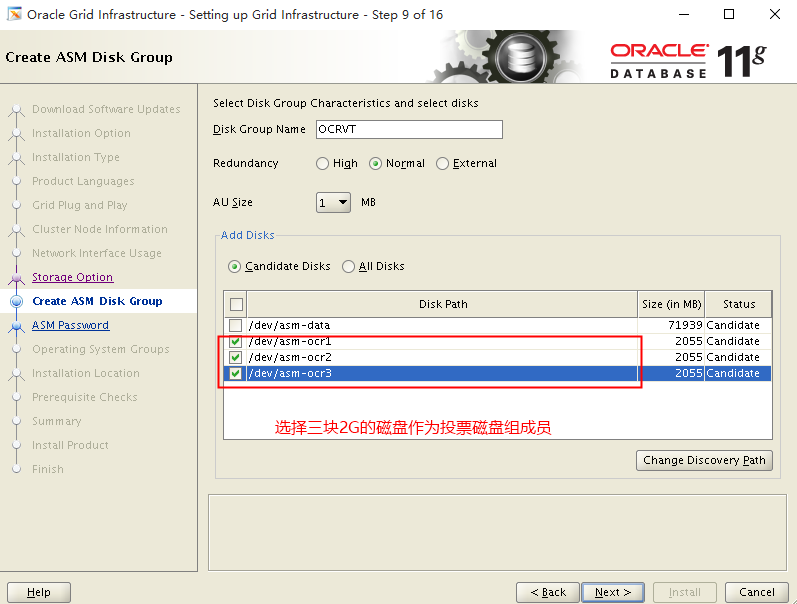
| OCR/Voting | ASM | 2G*3 | OCRVT | Normal |
| Datafile/Archivelog | ASM | 900G | DATA | External |
说明:
一般情况下存储会做Raid,有磁盘级别的镜像和保护,因此建议OCR磁盘组使用Normal方式镜像,同时归档和数据库磁盘为外部冗余方式。
二 安装前准备配置
2.1 检查两台机器物理内存
[root@ node1 ~]# top | grep Mem
Mem: 16170748k total, 15670912k used,  499836k free,  278212k buffers
[root@ node2 ~]# top | grep Mem
Mem: 16170748k total, 15658388k used,  512360k free,  276632k buffers
2.2 检查两台机器swap和/tmp
[root@ node 1 ~]# top | grep Swap
Swap: 16777212k total,  40868k used, 16736344k free, 12668624k cached
[root@ node 2 ~]# top | grep Swap
Swap: 16777212k total,  40868k used, 16736344k free, 12668624k cached
[root@ node1 ~]# df -h /tmp/
Filesystem      Size Used Avail Use% Mounted on
/dev/sda3       28G 3.8G  22G 15% /
[root@ node 2 ~]# df -h /tmp/
Filesystem      Size Used Avail Use% Mounted on
/dev/sda3       28G 3.8G  22G 15% /
2.3 验证操作系统版本和bit
[root@ node1 ~]# uname -a
Linux node2 2.6.32-504.el6.x86_64 #1 SMP Tue Sep 16 01:56:35 EDT 2014 x86_64 x86_64 x86_64 GNU/Linux

[root@ node1 ~]# cat /etc/redhat-release
Red Hat Enterprise Linux Server release 6.6 (Santiago)

[root@ node2 ~]# uname -a
Linux node2 2.6.32-504.el6.x86_64 #1 SMP Tue Sep 16 01:56:35 EDT 2014 x86_64 x86_64 x86_64 GNU/Linux

[root@ node2 ~]# cat /etc/redhat-release
Red Hat Enterprise Linux Server release 6.9 (Santiago)
2.4 关闭防火墙和NetworkManager
service iptables stop
chkconfig iptables off

service ip6tables stop
chkconfig ip6tables off

service NetworkManager stop
chkconfig NetworkManager off
2.5 关闭selinux
setenforce 0

vi /etc/selinux/config

# This file controls the state of SELinux on the system.
# SELINUX= can take one of these three values:
#    enforcing - SELinux security policy is enforced.
#    permissive - SELinux prints warnings instead of enforcing.
#    disabled - SELinux is fully disabled.
SELINUX=disabled
# SELINUXTYPE= type of policy in use. Possible values are:
#    targeted - Only targeted network daemons are protected.
#    strict - Full SELinux protection.
SELINUXTYPE=targeted
2.6 配置网络环境和host文件
vi /etc/hosts

172.16.2.1  node1
172.16.2.1  node2

192.168.1.1 node1-priv
192.168.1.2 node2-priv

172.16.2.11 node1-vip
172.16.2.12 node1-vip

172.16.2.13 scan-cluster
2.7 安装所需要的软件包
\#配置yum仓库
mount /dev/cdrom /mnt

mv /etc/yum.repos.d/* /tmp

vi /etc/yum.repos.d/rhel-debuginfo.repo

[rhel-debuginfo]
name=Red Hat Enterprise Linux \$releasever - \$basearch - Debug
baseurl=file:///mnt/
enabled=1
gpgcheck=0
yum -y install binutils compat-libcap1 compat-libstdc++-33 compat-libstdc++-33 compat-libstdc++-33.i686 gcc gcc-c++ \
elfutils-libelf elfutils-libelf-devel glibc.i686 glibc glibc-devel.i686 glibc-devel libgcc.i686 libgcc libstdc++.i686 libstdc++ \
libstdc++-devel.i686 libstdc++-devel libaio.i686 libaio libaio-devel.i686 libaio-devel make \
sysstat unixODBC.i686 unixODBC unixODBC-devel.i686 unixODBC-devel2.8 创建grid,oracle的用户和需要的组
groupadd -g 2001 oinstall
groupadd -g 2002 dba

useradd -u 2001 -g oinstall -G dba grid
useradd -u 2002 -g oinstall -G dba oracle

echo 'hc@oracle321#' | passwd --stdin grid
echo 'hc@oracle321#' | passwd --stdin oracle
2.9 创建安装目录
mkdir -p /u01/app/grid
mkdir -p /u01/app/11.2.0/grid
mkdir -p /u01/app/oracle/product/11.2.0/db_1
chmod -R 755 /u01/
chown -R grid:oinstall /u01
chown -R oracle:oinstall /u01/app/oracle
2.10 设置grid和Oracle用户的环境变量
grid 用户:
#vi /home/grid/.bash_profile

export ORACLE_BASE=/u01/app/grid
export ORACLE_SID=+ASM1 **#****二节点** **+ASM2**
export ORACLE_HOME=/u01/app/11.2.0/grid
export PATH=$ORACLE_HOME/bin:$PATH
export LD_LIBRARY_PATH=$ORACLE_HOME/lib:$LD_LIBRARY_PATH
oracle 用户:
#vi /home/oracle/.bash_profile

export ORACLE_BASE=/u01/app/oracle
export ORACLE_SID=orcl1  **#****二节点** **orcl2**
export ORACLE_HOME=$ORACLE_BASE/product/11.2.0/db_1
export PATH=$ORACLE_HOME/OPatch:$ORACLE_HOME/bin:$PATH
export LD_LIBRARY_PATH=$ORACLE_HOME/lib:$LD_LIBRARY_PATH
export NLS_LANG=AMERICAN_AMERICA.ZHS16GBK
2.11配置kernel和Oracle相关的Shell限制
2.11.1 调整内核参数
编辑文件 /etc/sysctl.conf 添加
#Kernel for Oracle 11g R2
fs.aio-max-nr = 1048576
fs.file-max = 6815744
kernel.shmall = 33554432
kernel.shmmax = 128849018860
kernel.shmmni = 4096
kernel.sem = 250 32000 100 128
net.ipv4.ip_local_port_range = 9000 65500
net.core.rmem_default = 262144
net.core.rmem_max = 4194304
net.core.wmem_default = 262144
net.core.wmem_max = 1048576
使内核参数生效
sysctl -p
2.11.2 添加用户资源限制
编辑文件/etc/security/limits.conf添加
grid       soft  nproc  2047
grid       hard  nproc  16384
grid       soft  nofile 1024
grid       hard  nofile 65536
grid       soft  stack  10240
oracle       soft  nproc  2047
oracle       hard  nproc  16384
oracle       soft  nofile 1024
oracle       hard  nofile 65536
oracle       soft  stack  10240
2.11.3 编辑用户配置文件
vi /etc/profile 添加
if [ $USER = "oracle" ]||[ $USER = "grid" ]; then
  if [ $SHELL = "/bin/ksh" ]; then
   ulimit -p 16384
   ulimit -n 65536
  else
   ulimit -u 16384 -n 65536
  fi
umask 022
fi
2.11.4 编辑登陆配置文件
编辑文件 /etc/pam.d/login 添加
session required pam_limits.so三、配置ASM共享磁盘
3.1 分区
将共享磁盘分区,前三分区2G作为投票盘,剩余空间作为一个分区留给数据和归档
[root@node1 nodes]# fdisk -l /dev/sdb

Disk /dev/sdb: 81.9 GB, 81906368512 bytes
255 heads, 63 sectors/track, 9957 cylinders
Units = cylinders of 16065 * 512 = 8225280 bytes
Sector size (logical/physical): 512 bytes / 512 bytes
I/O size (minimum/optimal): 512 bytes / 512 bytes
Disk identifier: 0xfac6fe94

 Device Boot   Start     End   Blocks  Id System

/dev/sdb1        1    9957  79979571  5 Extended
/dev/sdb5        1     262   2104452  83 Linux
/dev/sdb6       263     524   2104483+ 83 Linux
/dev/sdb7       525     786   2104483+ 83 Linux
/dev/sdb8       787    9957  73666026  83 Linux
3.2 获取磁盘wwid 号
[root@node1 nodes]# /sbin/scsi_id --whitelisted --replace-whitespace --device=/dev/sdb

14f504e46494c45525379675470622d744d6a662d55314b79
3.3 编辑udev磁盘管理文件
vi /etc/udev/rules.d/99-oracle-asmdevices.rules 添加
KERNEL=="sd*5", BUS=="scsi", PROGRAM=="/sbin/scsi_id --whitelisted --replace-whitespace --device=/dev/$parent", RESULT=="14f504e46494c45525379675470622d744d6a662d55314b79", NAME="asm-ocr1", OWNER="grid", GROUP="dba", MODE="0660"
KERNEL=="sd*6", BUS=="scsi", PROGRAM=="/sbin/scsi_id --whitelisted --replace-whitespace --device=/dev/$parent", RESULT=="14f504e46494c45525379675470622d744d6a662d55314b79", NAME="asm-ocr2", OWNER="grid", GROUP="dba", MODE="0660"
KERNEL=="sd*7", BUS=="scsi", PROGRAM=="/sbin/scsi_id --whitelisted --replace-whitespace --device=/dev/$parent", RESULT=="14f504e46494c45525379675470622d744d6a662d55314b79", NAME="asm-ocr3", OWNER="grid", GROUP="dba", MODE="0660"
KERNEL=="sd*8", BUS=="scsi", PROGRAM=="/sbin/scsi_id --whitelisted --replace-whitespace --device=/dev/$parent", RESULT=="14f504e46494c45525379675470622d744d6a662d55314b79", NAME="asm-data", OWNER="grid", GROUP="dba", MODE="0660"
3.4 执行如下命令,使udev策略生效
udevadm trigger
[root@node1 rules.d]# ll /dev/asm-*

brw-rw---- 1 grid dba 8, 24 Aug 14 10:28 /dev/asm-data

brw-rw---- 1 grid dba 8, 21 Aug 14 10:28 /dev/asm-ocr1

brw-rw---- 1 grid dba 8, 22 Aug 14 10:28 /dev/asm-ocr2

brw-rw---- 1 grid dba 8, 23 Aug 14 10:28 /dev/asm-ocr3
3.5 将99-oracle-asmdevices.rules 文件拷贝到节点2
scp 99-oracle-asmdevices.rules node2:/etc/udev/rules.d/
root@node2's password:
99-oracle-asmdevices.rules 100% 916 0.9KB/s 00:00
节点2执行如下命令,使udev策略生效
udevadm trigger
[root@node2 rules.d]# ll /dev/asm-*

brw-rw---- 1 grid dba 8, 24 Aug 14 10:31 /dev/asm-data
brw-rw---- 1 grid dba 8, 21 Aug 14 10:31 /dev/asm-ocr1
brw-rw---- 1 grid dba 8, 22 Aug 14 10:31 /dev/asm-ocr2
brw-rw---- 1 grid dba 8, 23 Aug 14 10:31 /dev/asm-ocr3
四 安装grid 软件
将grid安装包上传到/soft目录,并解压
4.1 运行 ./runInstaller进入安装界面
[grid@node1 ~]$ cd /soft/grid/

[grid@node1 grid]$ ll

total 68

drwxr-xr-x 4 grid oinstall 4096 Aug 26 2013 install
-rw-r--r-- 1 grid oinstall 30016 Aug 27 2013 readme.html
drwxr-xr-x 2 grid oinstall 4096 Aug 26 2013 response
drwxr-xr-x 2 grid oinstall 4096 Aug 26 2013 rpm
-rwxr-xr-x 1 grid oinstall 4878 Aug 26 2013 runcluvfy.sh
-rwxr-xr-x 1 grid oinstall 3268 Aug 26 2013 runInstaller
drwxr-xr-x 2 grid oinstall 4096 Aug 26 2013 sshsetup
drwxr-xr-x 14 grid oinstall 4096 Aug 26 2013 stage
-rw-r--r-- 1 grid oinstall  500 Aug 27 2013 welcome.html
[grid@node1 grid]$ ./runInstaller


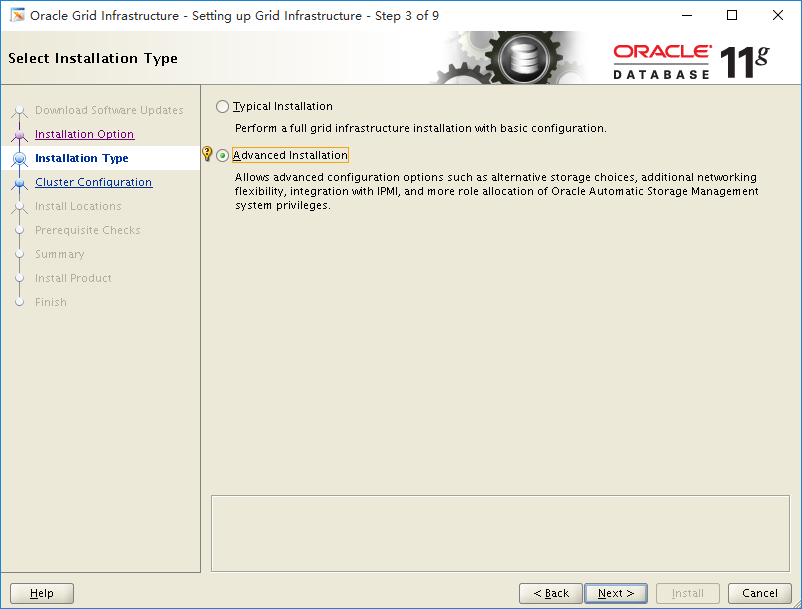
4.2 选择“Advanced Installation”
4.3 选择安装语言,默认的 next

4.4 Grid Plug and Play Information
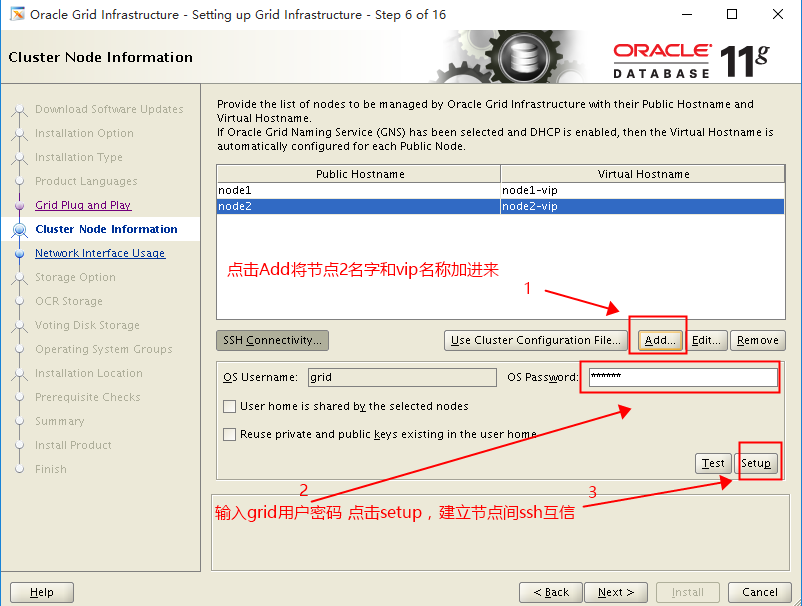
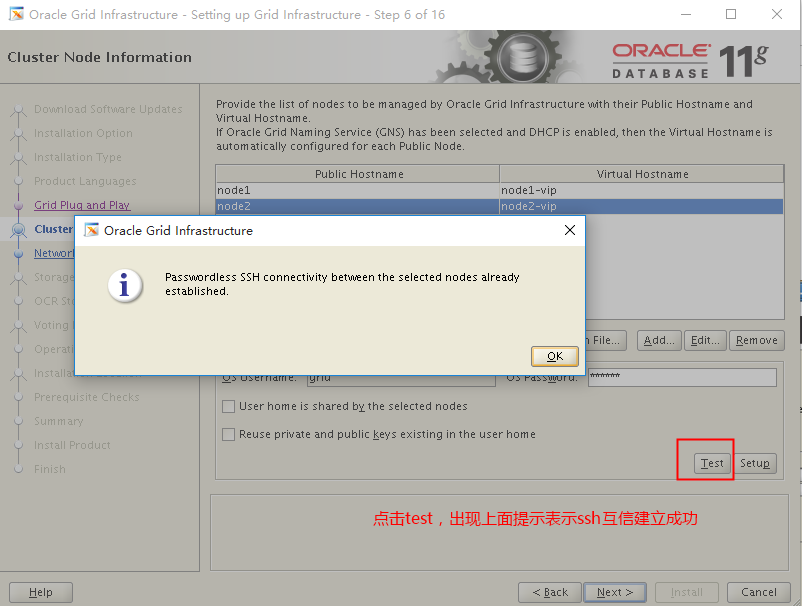
4.5 Cluster Node Information
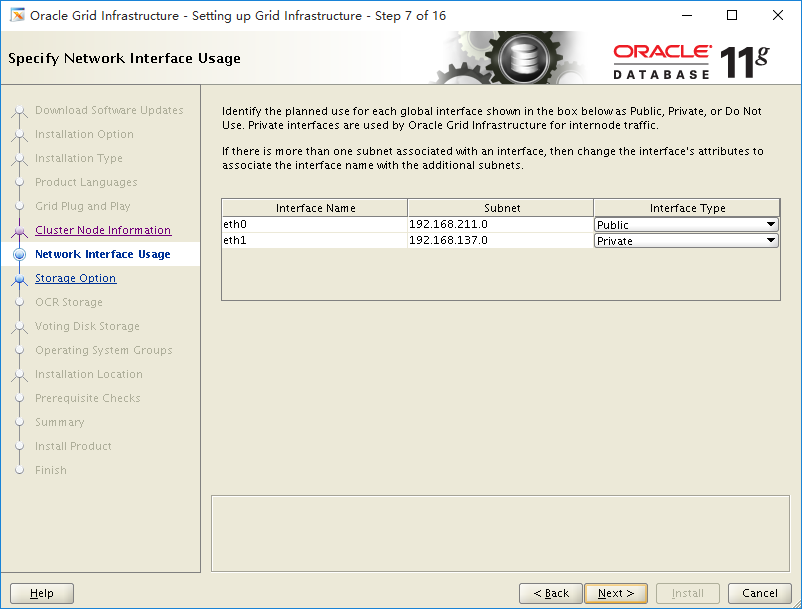
4.6 Specify Network Interface Usage
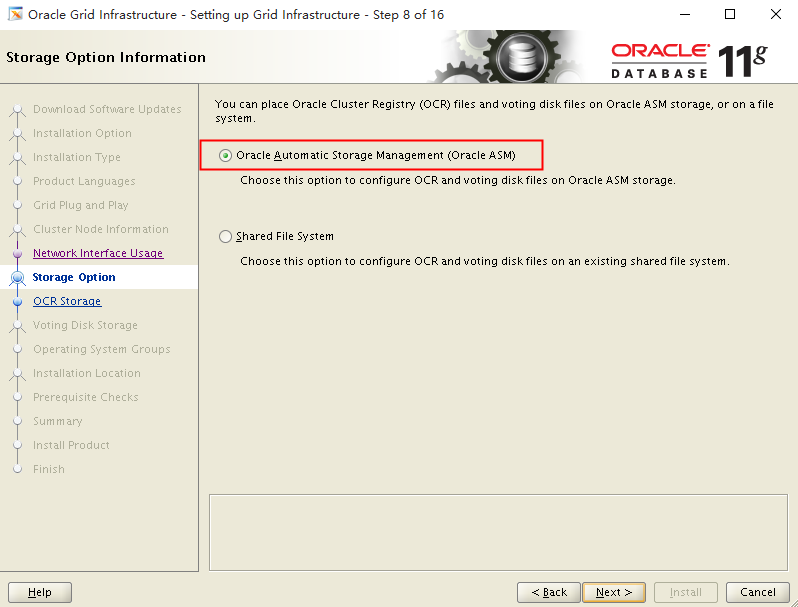
4.7 Storage Option Information
4.8 Create ASM Disk Group
4.9 ASM Password
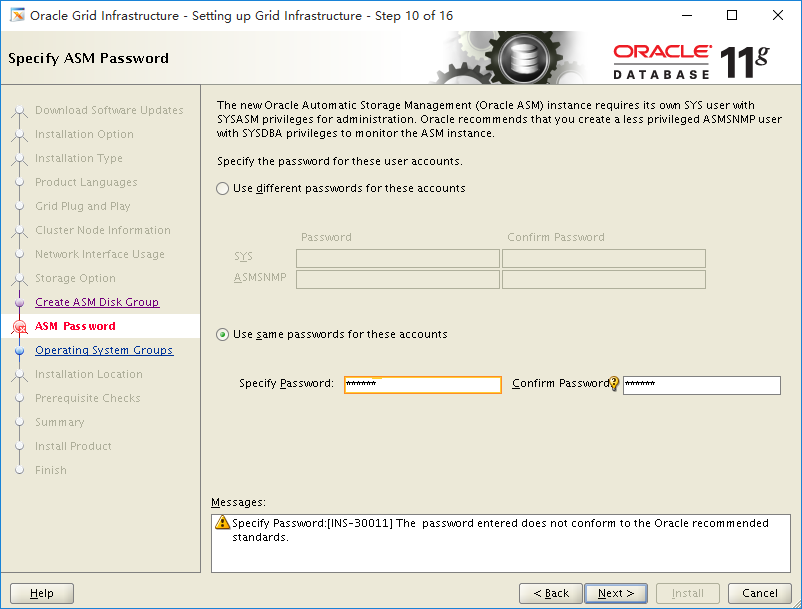
4.10 Failure Isolation Support
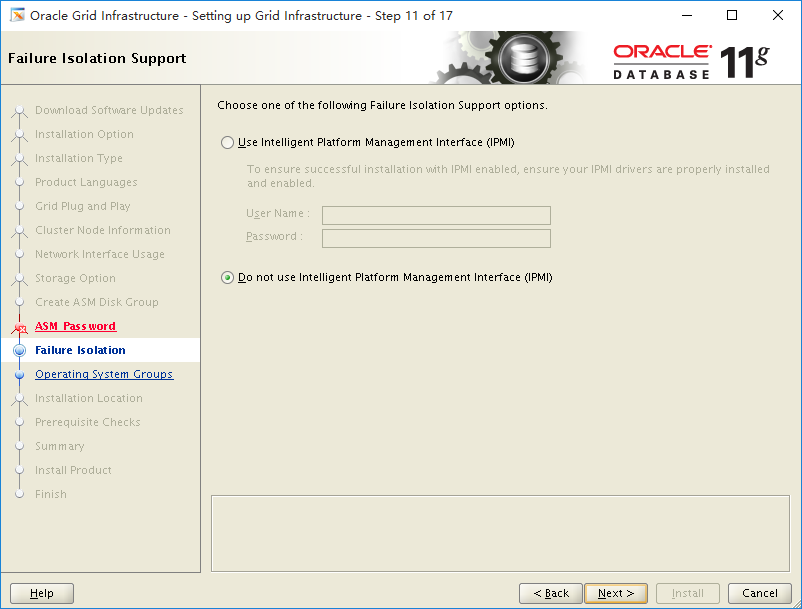
4.11 Privileged Operating System Group
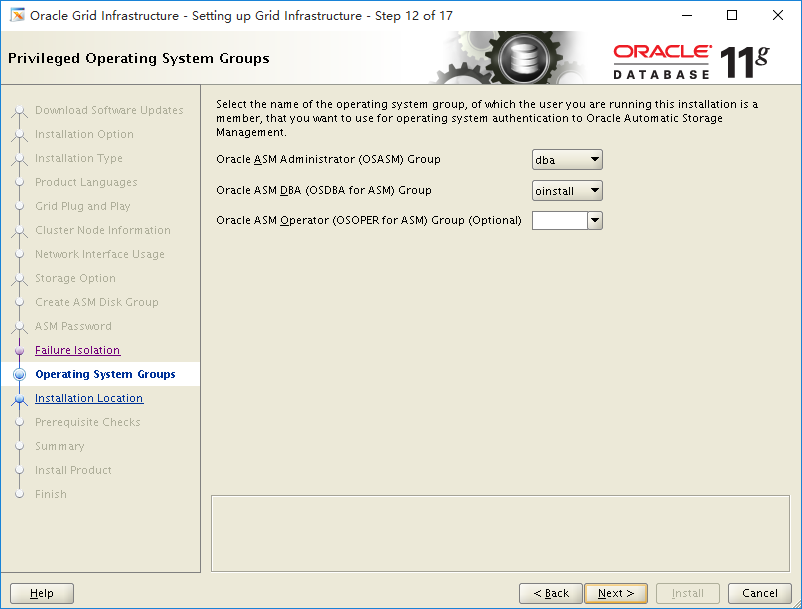
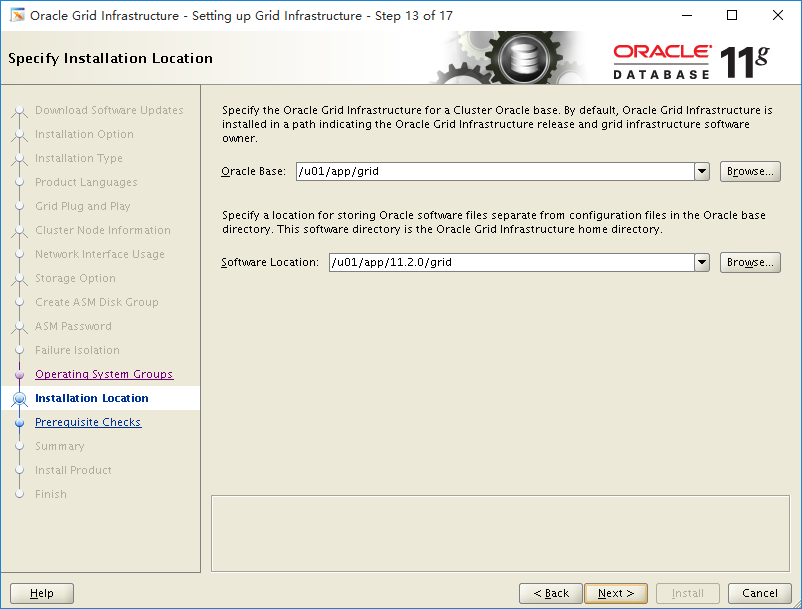
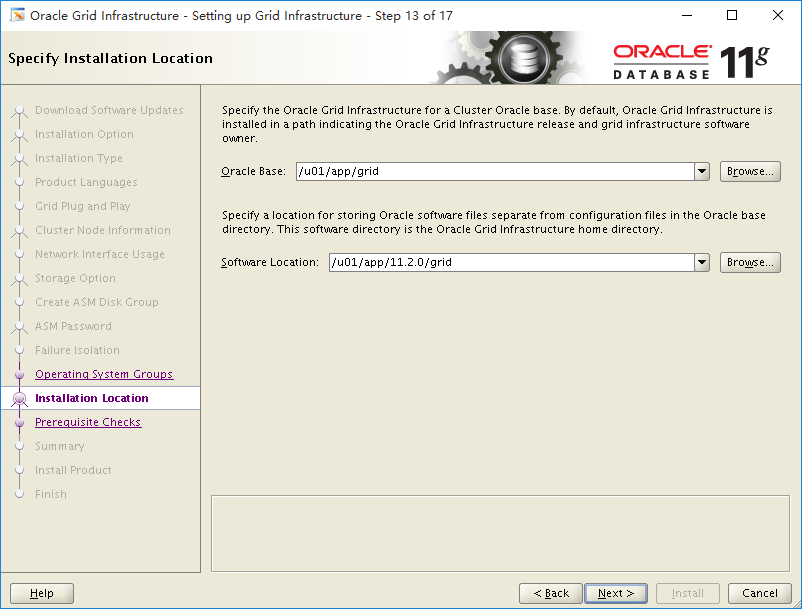
4.12 Specify Installation Location
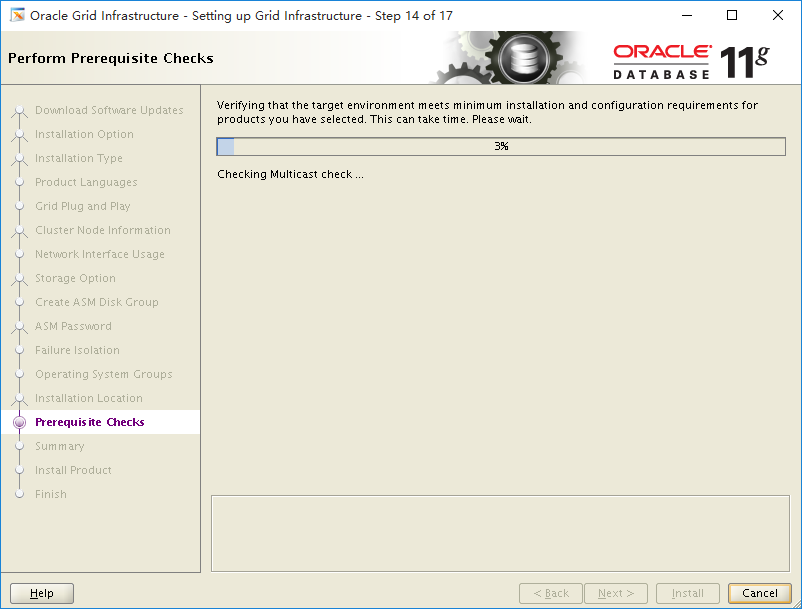
4.13 Perform Prerequisite Checks
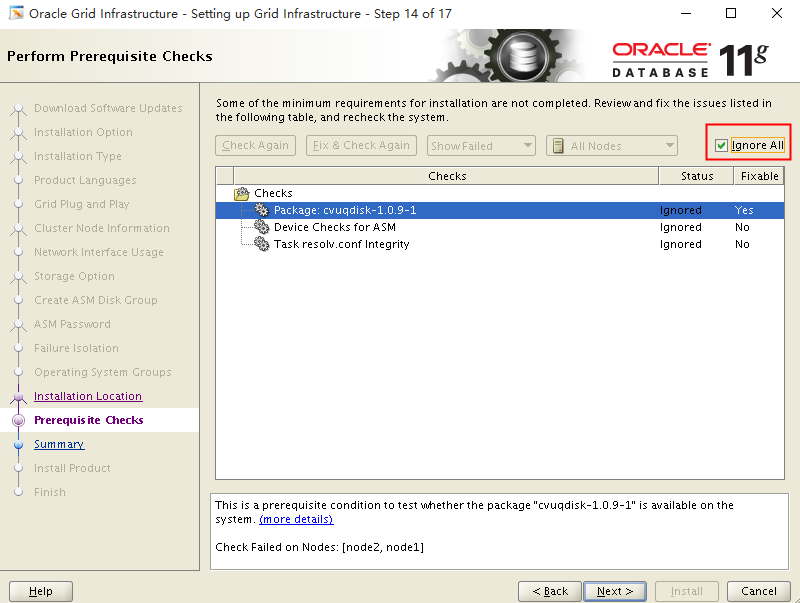
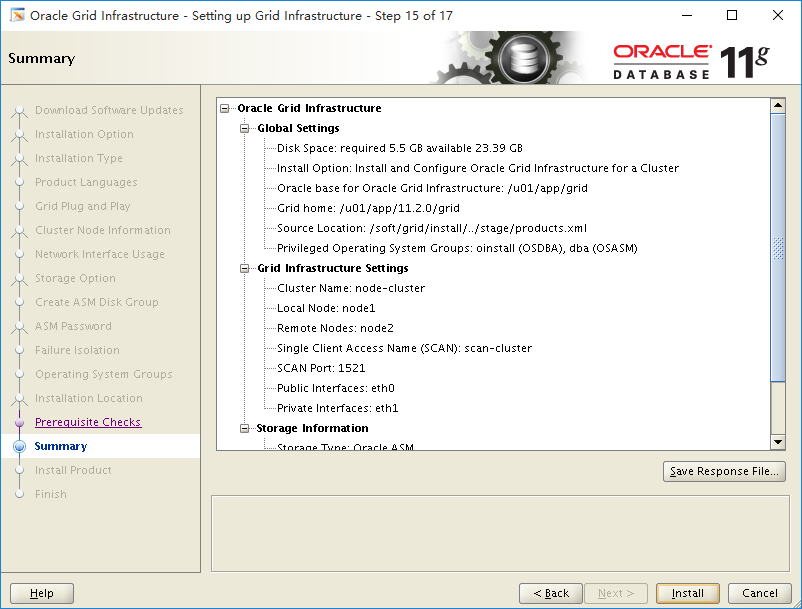
4.15 Summary Informations
4.16 Setup
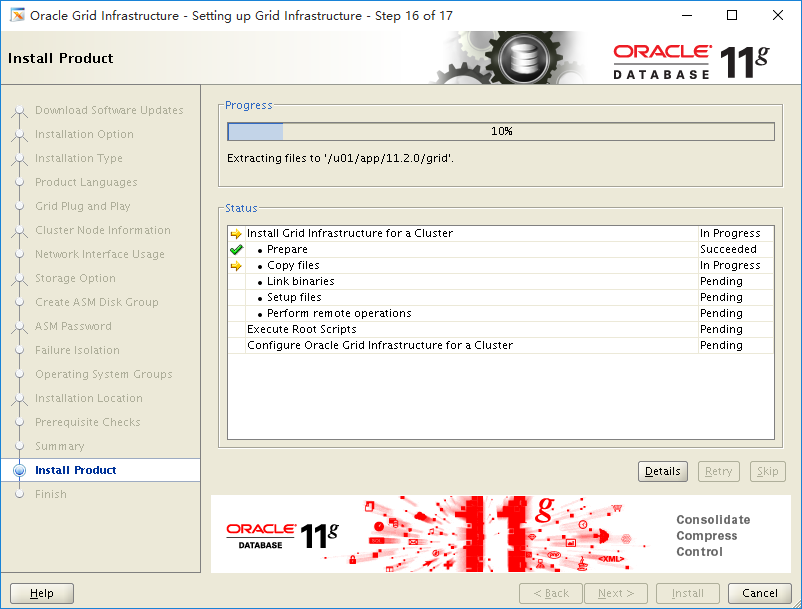
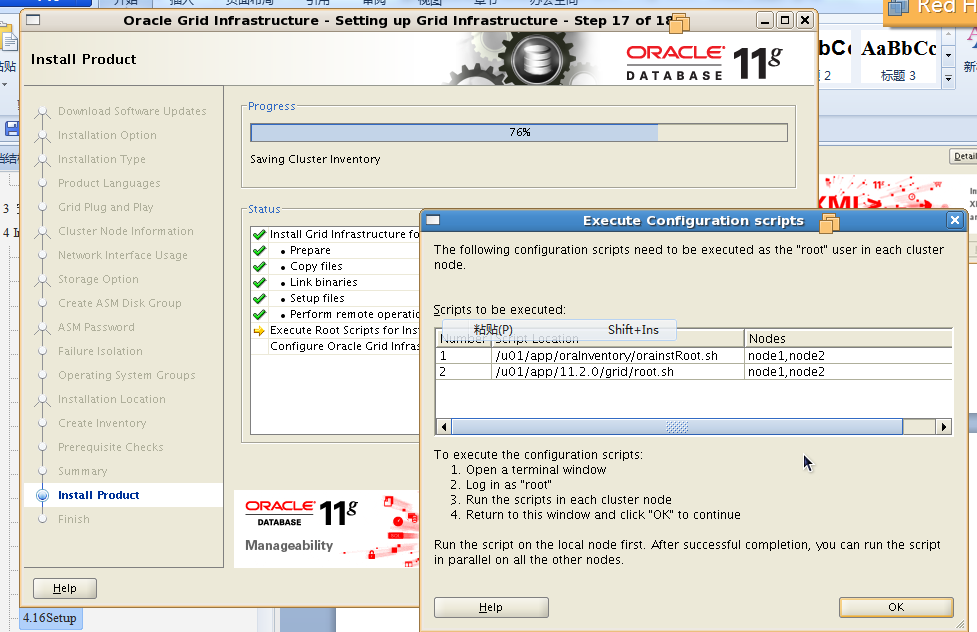
4.17 RAC Nodes通过root用户执行对应的脚本
NODE1:
[root@node1 grid]# . /u01/app/oraInventory/orainstRoot.sh

Changing permissions of /u01/app/oraInventory.
Adding read,write permissions for group.
Removing read,write,execute permissions for world.

Changing groupname of /u01/app/oraInventory to oinstall.
The execution of the script is complete.

[root@node1 ~]# /u01/app/11.2.0/grid/root.sh
Performing root user operation for Oracle 11g

The following environment variables are set as:
  ORACLE_OWNER= grid
  ORACLE_HOME= /u01/app/11.2.0/grid

Enter the full pathname of the local bin directory: [/usr/local/bin]:

The contents of "dbhome" have not changed. No need to overwrite.
The contents of "oraenv" have not changed. No need to overwrite.
The contents of "coraenv" have not changed. No need to overwrite.


Creating /etc/oratab file...

Entries will be added to the /etc/oratab file as needed by

Database Configuration Assistant when a database is created

Finished running generic part of root script.

Now product-specific root actions will be performed.


Using configuration parameter file: /u01/app/11.2.0/grid/crs/install/crsconfig_params

Creating trace directory

User ignored Prerequisites during installation
Installing Trace File Analyzer
OLR initialization - successful
 root wallet
 root wallet cert
 root cert export
 peer wallet
 profile reader wallet
 pa wallet
 peer wallet keys
 pa wallet keys
 peer cert request
 pa cert request
 peer cert
 pa cert
 peer root cert TP
 profile reader root cert TP
 pa root cert TP
 peer pa cert TP
 pa peer cert TP
 profile reader pa cert TP
 profile reader peer cert TP
 peer user cert
 pa user cert

Adding Clusterware entries to upstart

CRS-2672: Attempting to start 'ora.mdnsd' on 'node1'
CRS-2676: Start of 'ora.mdnsd' on 'node1' succeeded
CRS-2672: Attempting to start 'ora.gpnpd' on 'node1'
CRS-2676: Start of 'ora.gpnpd' on 'node1' succeeded
CRS-2672: Attempting to start 'ora.cssdmonitor' on 'node1'
CRS-2672: Attempting to start 'ora.gipcd' on 'node1'
CRS-2676: Start of 'ora.cssdmonitor' on 'node1' succeeded
CRS-2676: Start of 'ora.gipcd' on 'node1' succeeded
CRS-2672: Attempting to start 'ora.cssd' on 'node1'
CRS-2672: Attempting to start 'ora.diskmon' on 'node1'
CRS-2676: Start of 'ora.diskmon' on 'node1' succeeded
CRS-2676: Start of 'ora.cssd' on 'node1' succeeded

ASM created and started successfully.

Disk Group OCRVT created successfully.

clscfg: -install mode specified
Successfully accumulated necessary OCR keys.
Creating OCR keys for user 'root', privgrp 'root'..
Operation successful.
CRS-4256: Updating the profile
Successful addition of voting disk 82612aa4288f4f21bf978c79588b1103.
Successful addition of voting disk 06cb09f9c9e74fd5bf015f0a9bfefcfe.
Successful addition of voting disk a6c66b55564c4fb4bf34f09fbf525d48.
Successfully replaced voting disk group with +OCRVT.
CRS-4256: Updating the profile
CRS-4266: Voting file(s) successfully replaced
## STATE  File Universal Id        File Name Disk group
-- -----  -----------------        --------- ---------
 1. ONLINE  82612aa4288f4f21bf978c79588b1103 (/dev/asm-ocr1) [OCRVT]
 2. ONLINE  06cb09f9c9e74fd5bf015f0a9bfefcfe (/dev/asm-ocr2) [OCRVT]
 3. ONLINE  a6c66b55564c4fb4bf34f09fbf525d48 (/dev/asm-ocr3) [OCRVT]

Located 3 voting disk(s).
CRS-2672: Attempting to start 'ora.asm' on 'node1'
CRS-2676: Start of 'ora.asm' on 'node1' succeeded
CRS-2672: Attempting to start 'ora.OCRVT.dg' on 'node1'
CRS-2676: Start of 'ora.OCRVT.dg' on 'node1' succeeded
Preparing packages for installation...
cvuqdisk-1.0.9-1
Configure Oracle Grid Infrastructure for a Cluster ... succeeded
Node2:
[root@node2 ~]# . /u01/app/oraInventory/orainstRoot.sh

Changing permissions of /u01/app/oraInventory.
Adding read,write permissions for group.
Removing read,write,execute permissions for world.

Changing groupname of /u01/app/oraInventory to oinstall.
The execution of the script is complete.
[root@node2 nodes]# /u01/app/11.2.0/grid/root.sh
Performing root user operation for Oracle 11g

The following environment variables are set as:
  ORACLE_OWNER= grid
  ORACLE_HOME= /u01/app/11.2.0/grid

Enter the full pathname of the local bin directory: [/usr/local/bin]:
The contents of "dbhome" have not changed. No need to overwrite.
The contents of "oraenv" have not changed. No need to overwrite.
The contents of "coraenv" have not changed. No need to overwrite.


Creating /etc/oratab file...
Entries will be added to the /etc/oratab file as needed by
Database Configuration Assistant when a database is created
Finished running generic part of root script.
Now product-specific root actions will be performed.

Using configuration parameter file: /u01/app/11.2.0/grid/crs/install/crsconfig_params
Creating trace directory
User ignored Prerequisites during installation
Installing Trace File Analyzer
OLR initialization - successful
Adding Clusterware entries to upstart
CRS-4402: The CSS daemon was started in exclusive mode but found an active CSS daemon on node node1, number 1, and is terminating
An active cluster was found during exclusive startup, restarting to join the cluster
Preparing packages for installation...
cvuqdisk-1.0.9-1
Configure Oracle Grid Infrastructure for a Cluster ... succeeded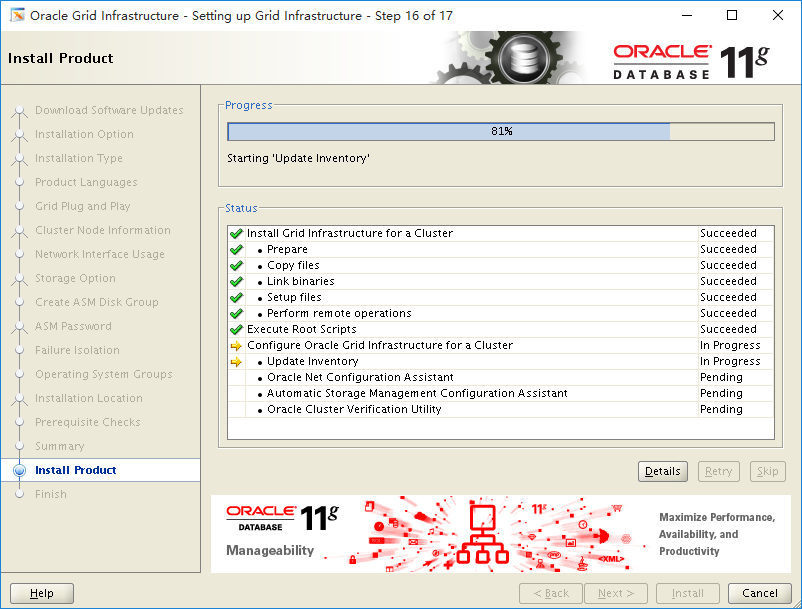
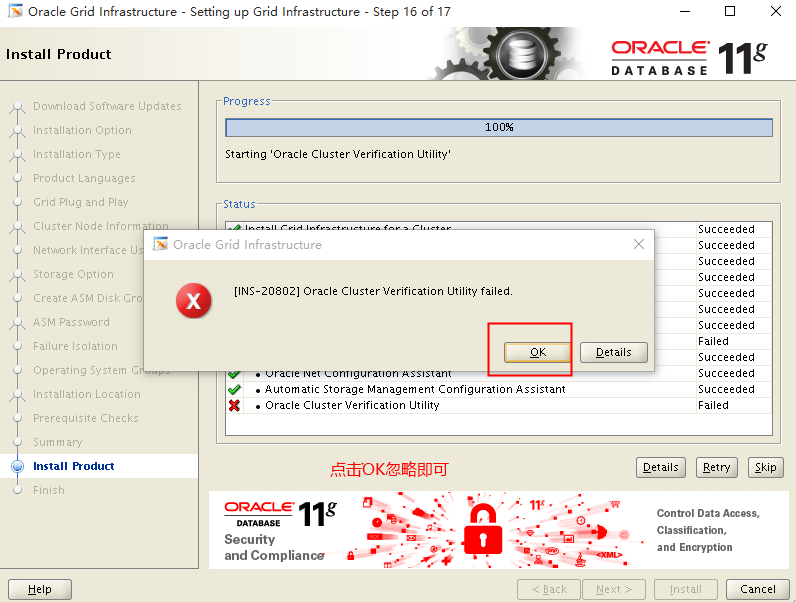
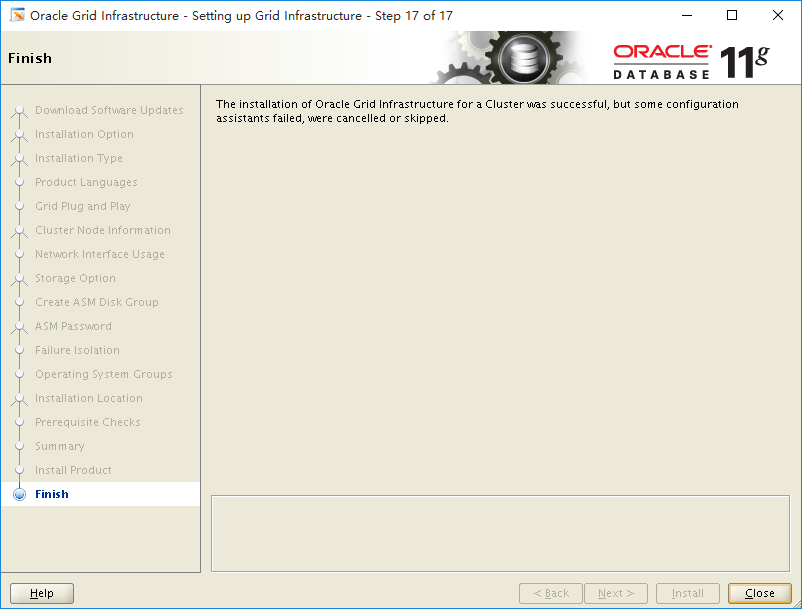
4.18 grid软件安装完成
五 创建DATA磁盘组
5.1以grid用户在任意一节点运行asmca,进入配置界面
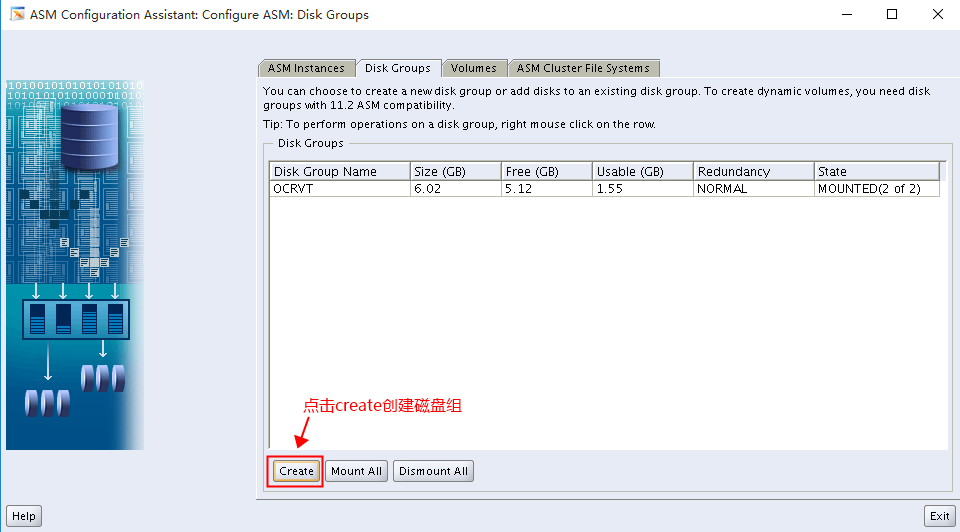 5.2点击create创建磁盘组
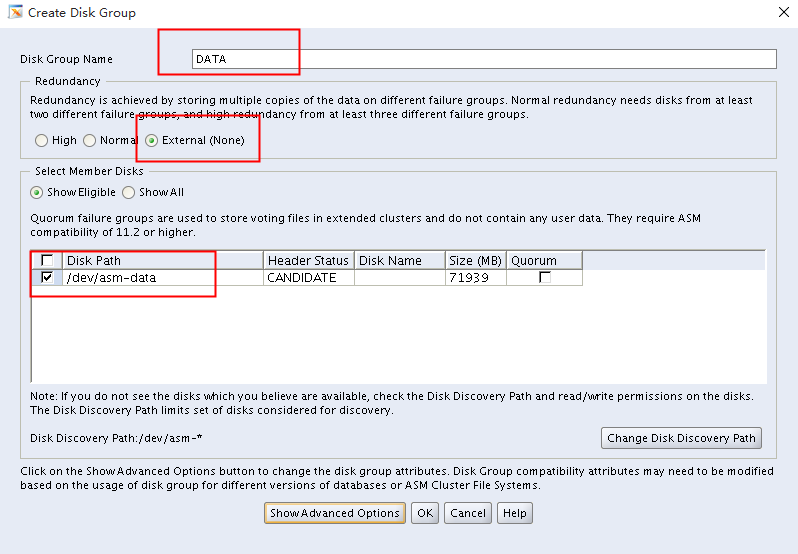
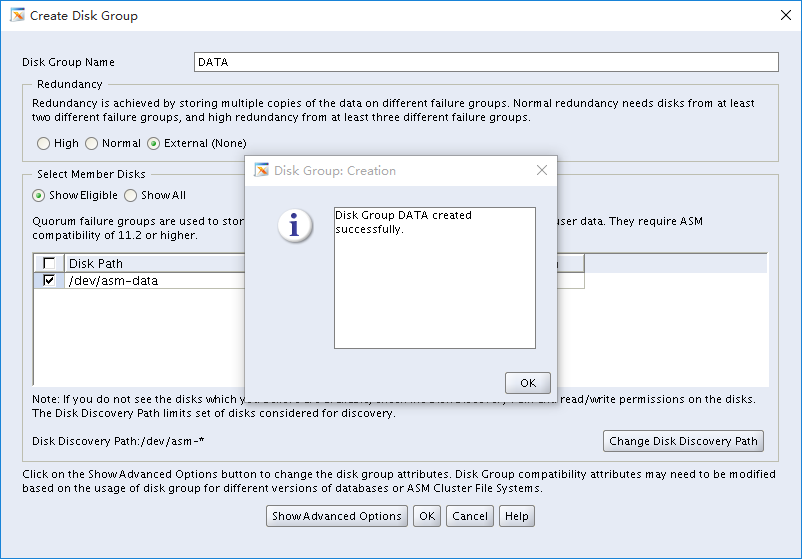
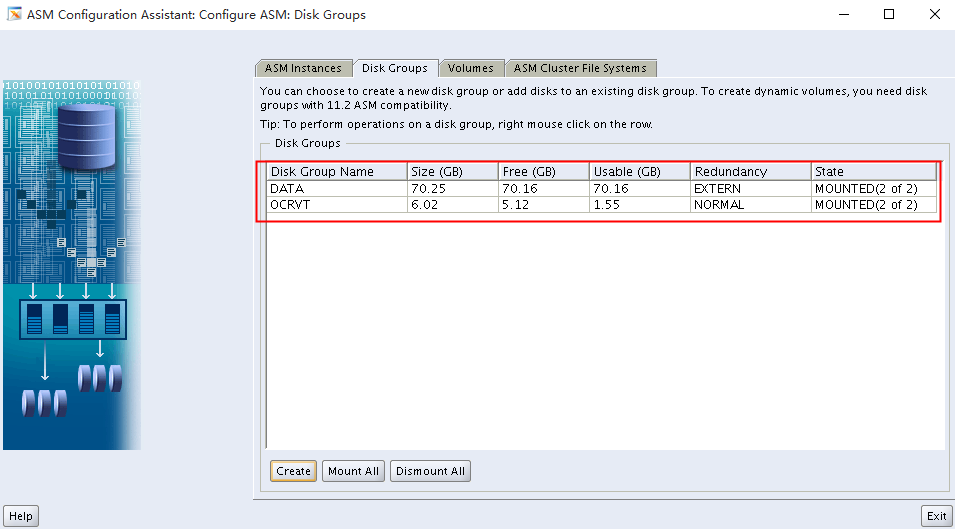
5.3核对已经创建好的磁盘组
六 Oracle database软件安装
6.1 Oracle用户在任意一节点运行./runInstaller

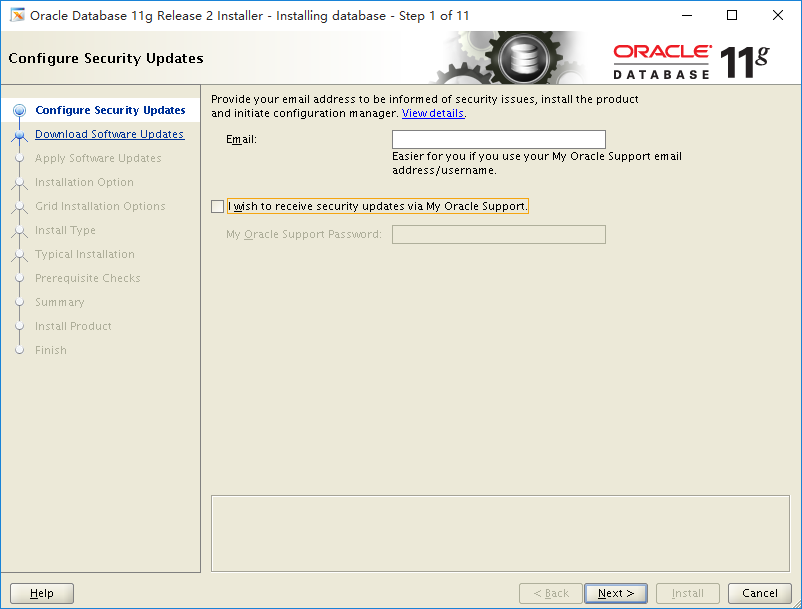
6.2 Configrue Security Updates
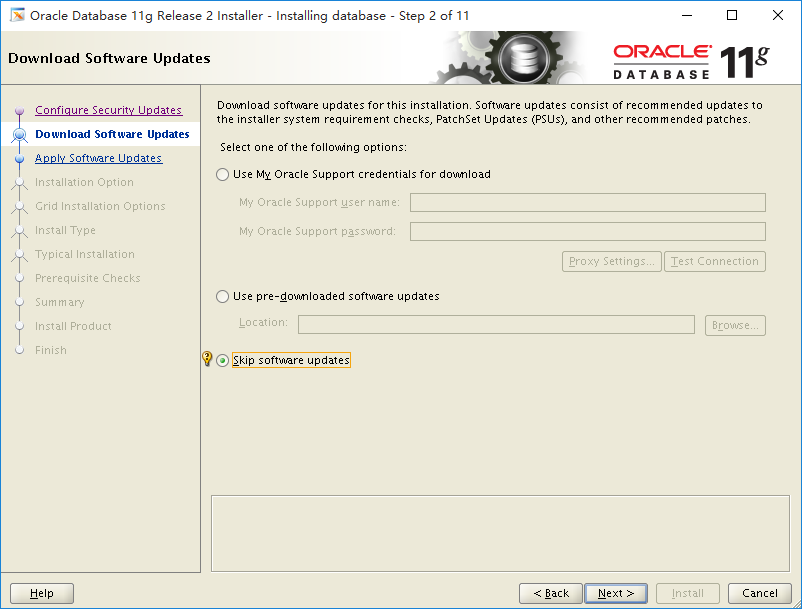 6.3 Select Installation Option
6.4 Nodes Selection
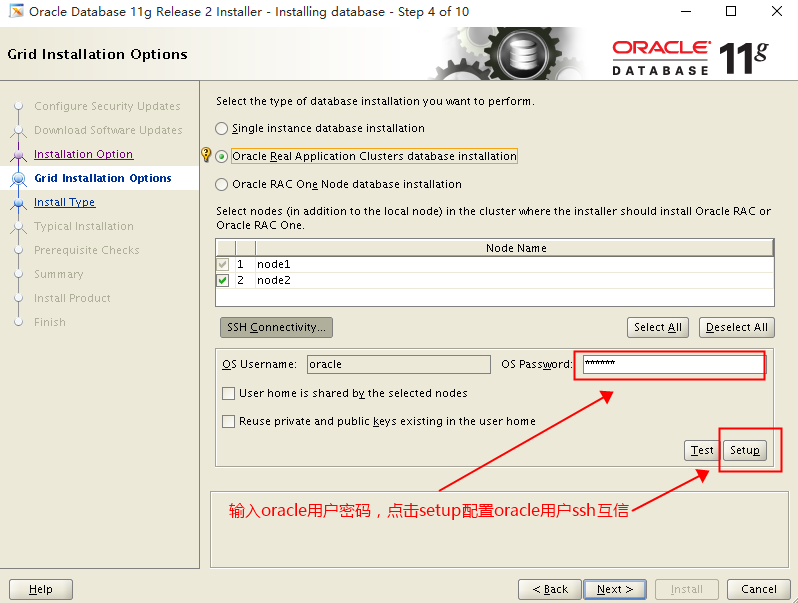
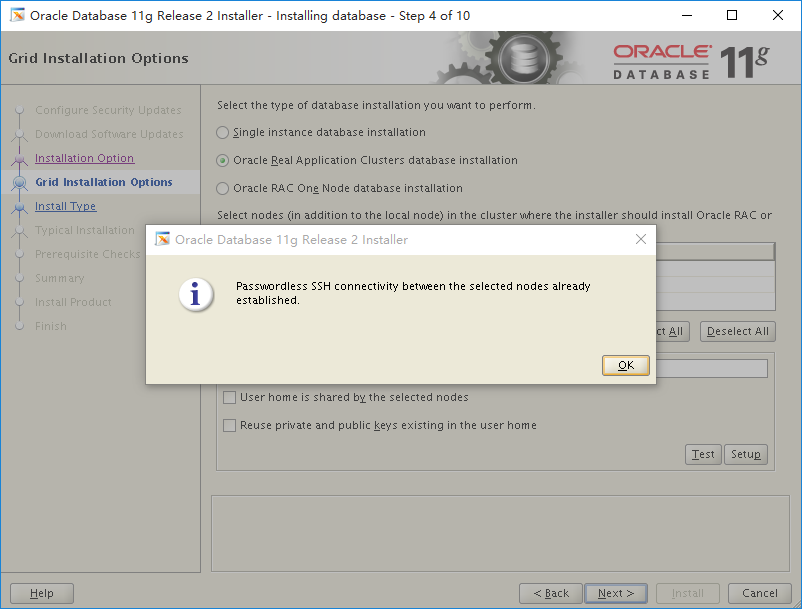
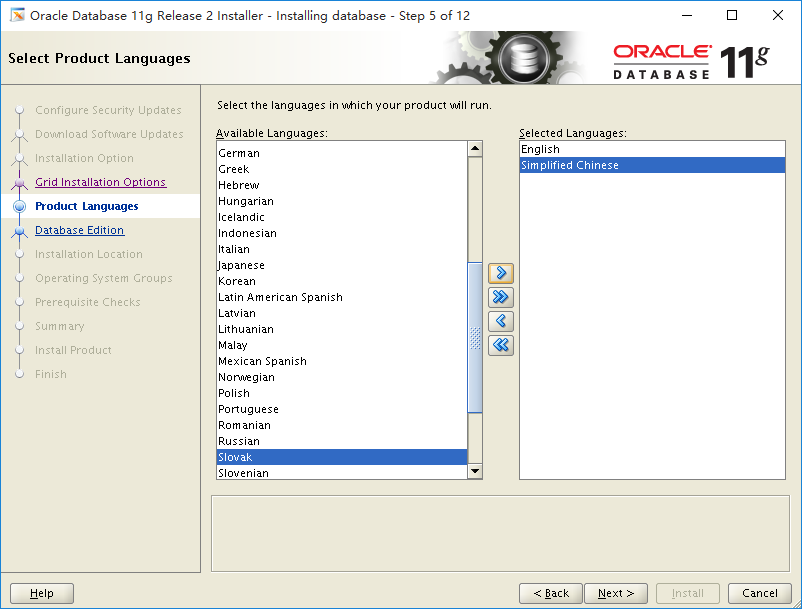
6.5 Select Product Languages
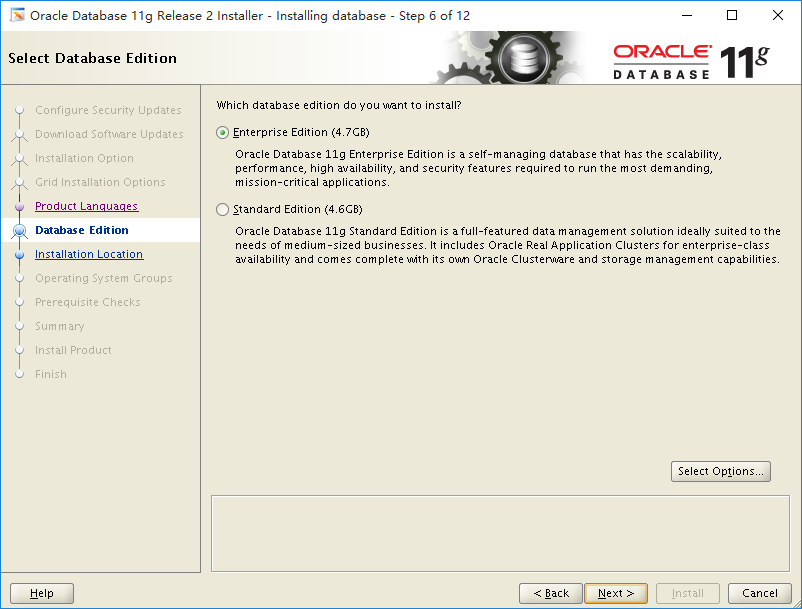
6.6 Select Database Edition
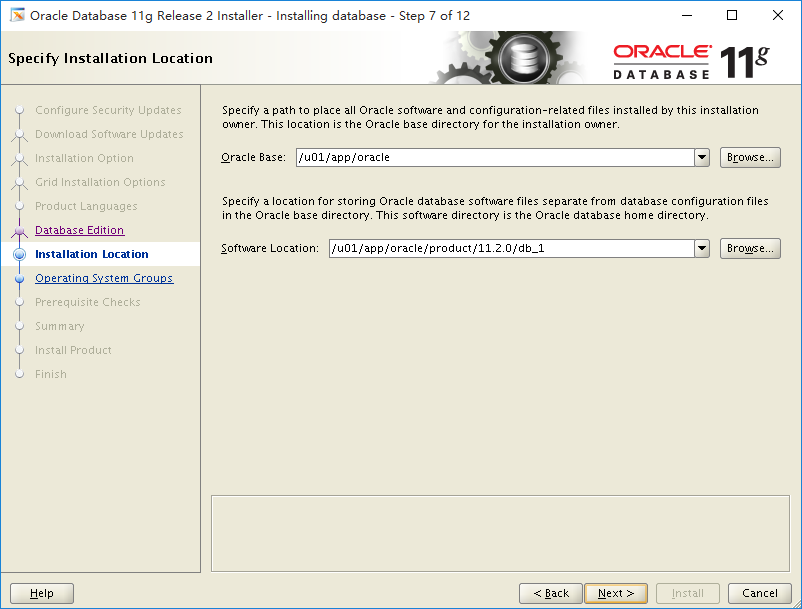
6.7 Specify Installation Location
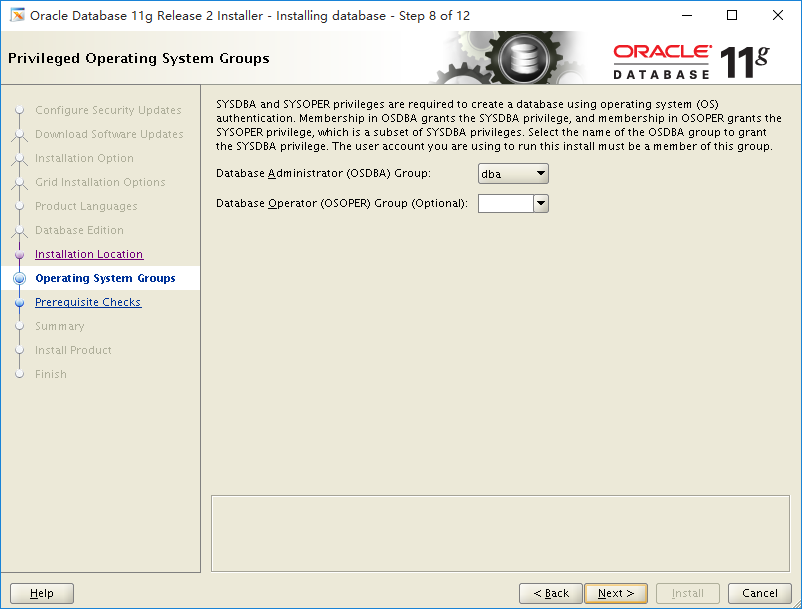
6.8 Privilege Operating System Groups
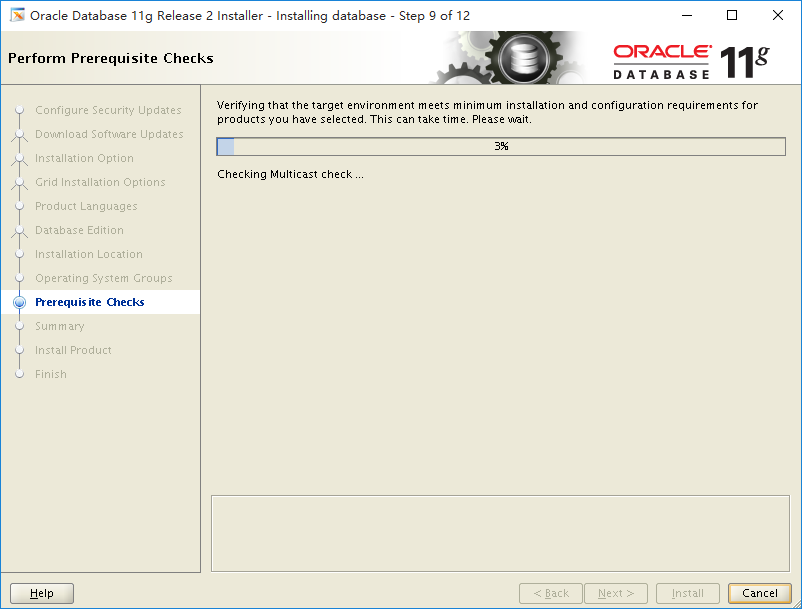
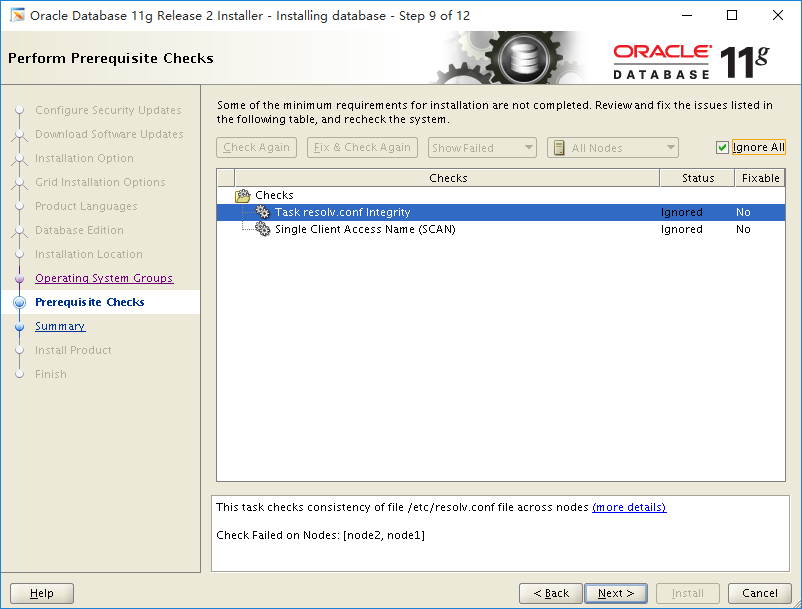
6.9 Perform Prerequisite Checks
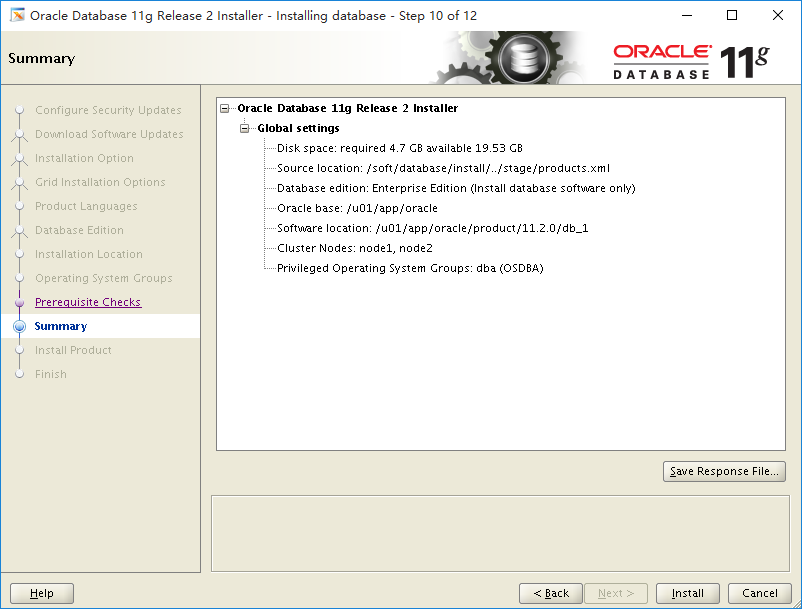
6.10 Summary Informations
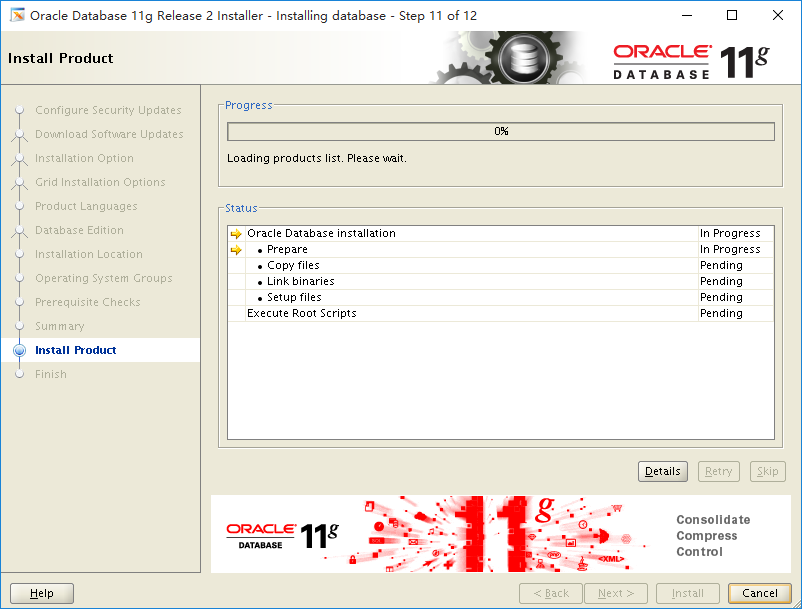
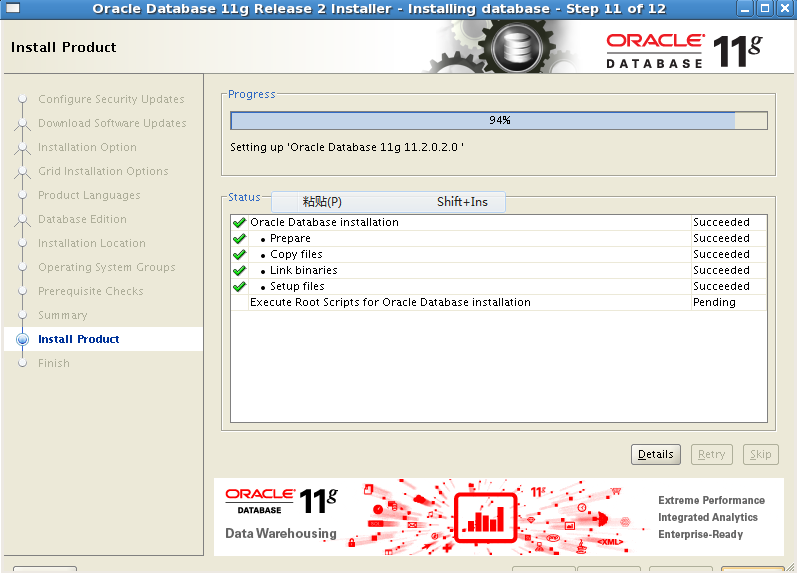
6.11 Install Product
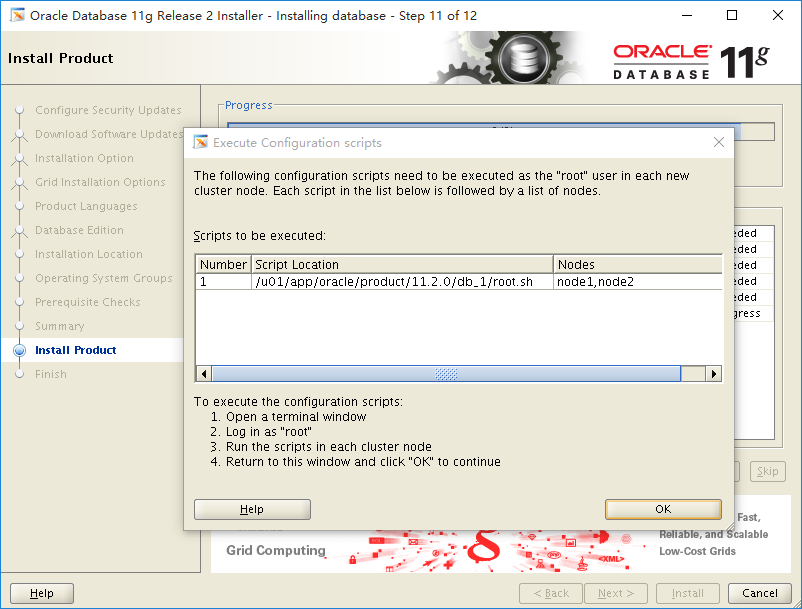
6.12 以root用户在两个节点运行root.sh脚本
[root@node1 ~]# /u01/app/oracle/product/11.2.0/db_1/root.sh
Running Oracle 11g root script...

The following environment variables are set as:
  ORACLE_OWNER= oracle
  ORACLE_HOME= /u01/app/oracle/product/11.2.0/db_1

Enter the full pathname of the local bin directory: [/usr/local/bin]:
The contents of "dbhome" have not changed. No need to overwrite.
The contents of "oraenv" have not changed. No need to overwrite.
The contents of "coraenv" have not changed. No need to overwrite.

Entries will be added to the /etc/oratab file as needed by
Database Configuration Assistant when a database is created
Finished running generic part of root script.
Now product-specific root actions will be performed.
Finished product-specific root actions.
[root@node2 ~]# /u01/app/oracle/product/11.2.0/db_1/root.sh
Running Oracle 11g root script...

The following environment variables are set as:
  ORACLE_OWNER= oracle
  ORACLE_HOME= /u01/app/oracle/product/11.2.0/db1

Enter the full pathname of the local bin directory: [/usr/local/bin]:
The contents of "dbhome" have not changed. No need to overwrite.
The contents of "oraenv" have not changed. No need to overwrite.
The contents of "coraenv" have not changed. No need to overwrite.

Entries will be added to the /etc/oratab file as needed by
Database Configuration Assistant when a database is created
Finished running generic part of root script.
Now product-specific root actions will be performed.
Finished product-specific root actions.
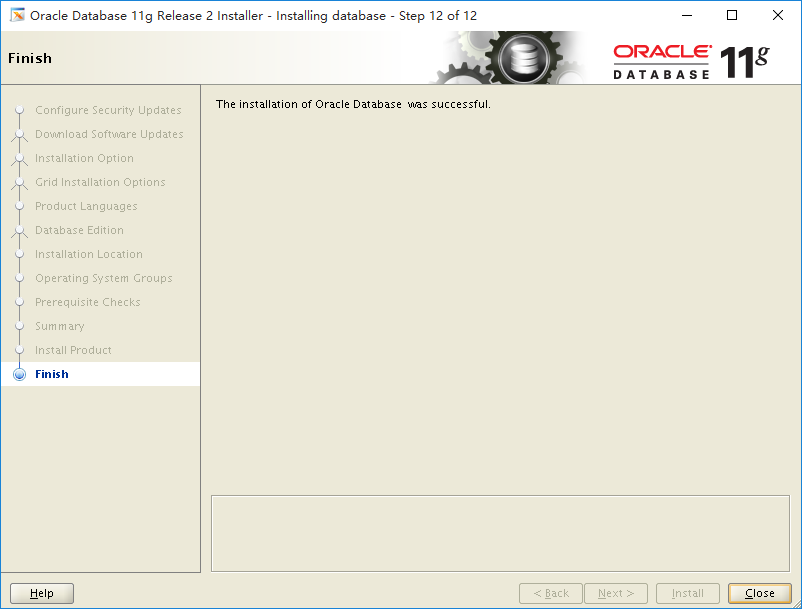
6.13 安装成功,关闭窗口
七 创建数据库
8.1 以Oracle用户在任意节点运行dbca
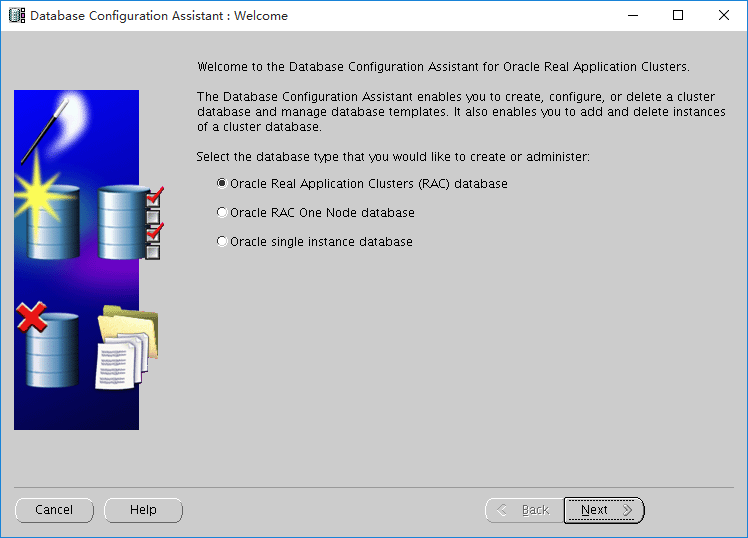
7.2 选择"Oracle Real Application Clusters Database"
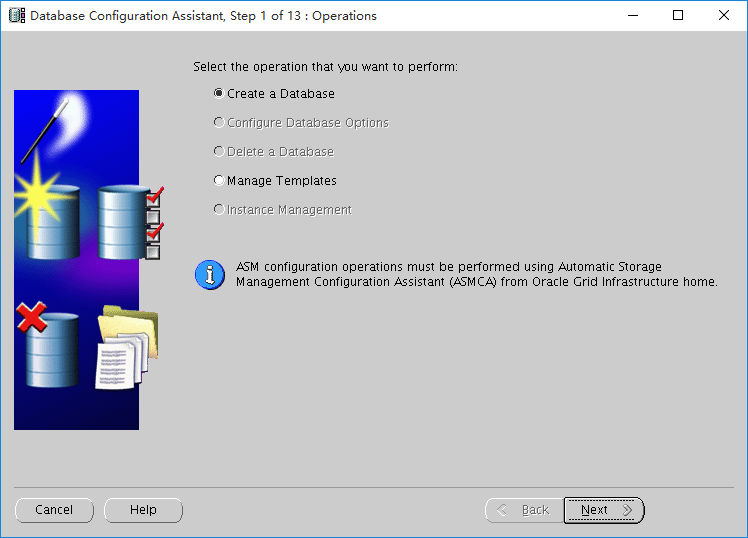
7.3 选择"Create a Database"
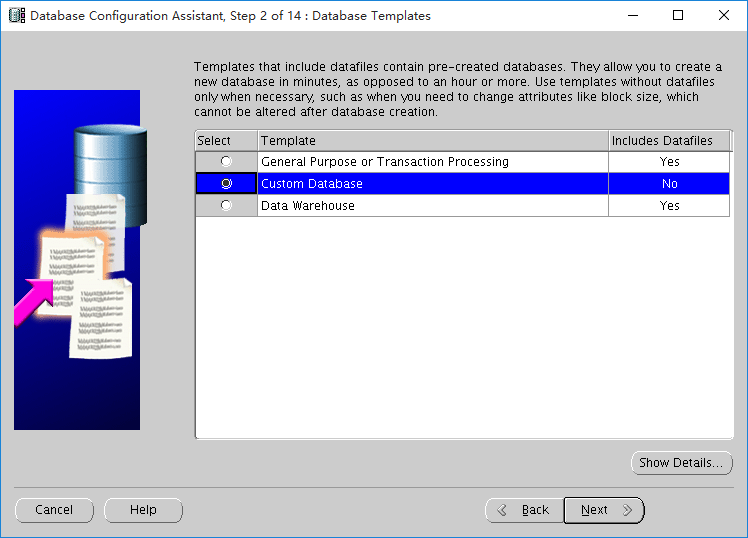
 7.4选择"Custom Database"
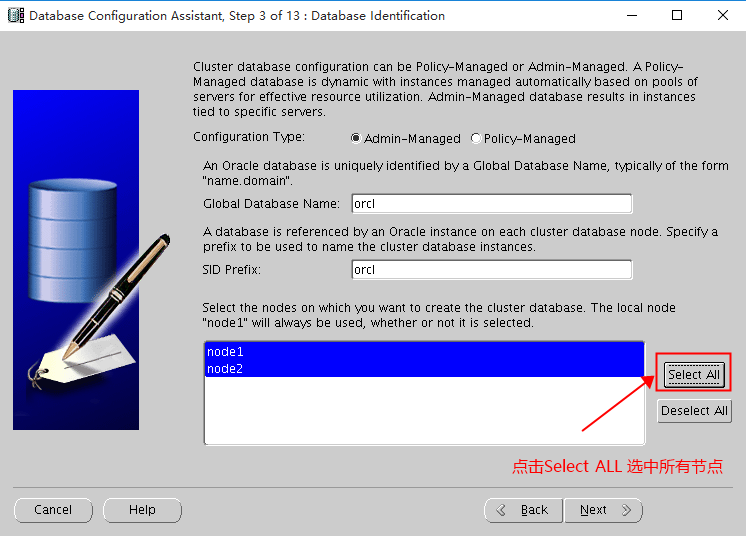
7.5 Database Identitification
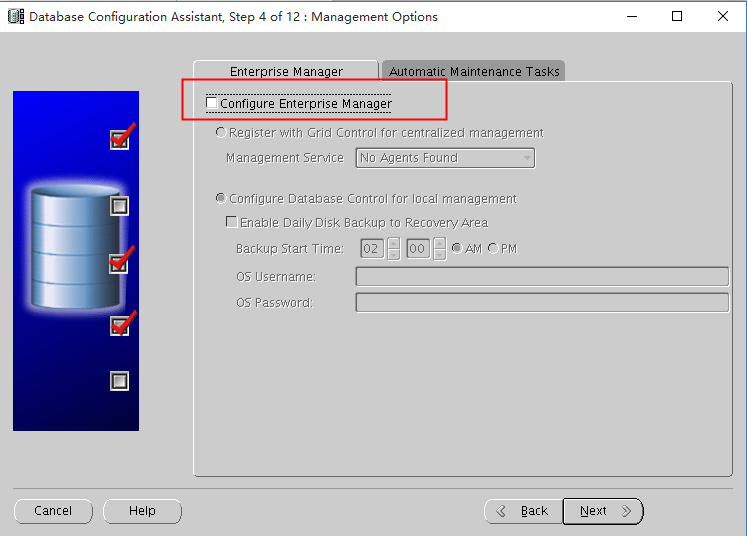
7.6 去掉勾选EM
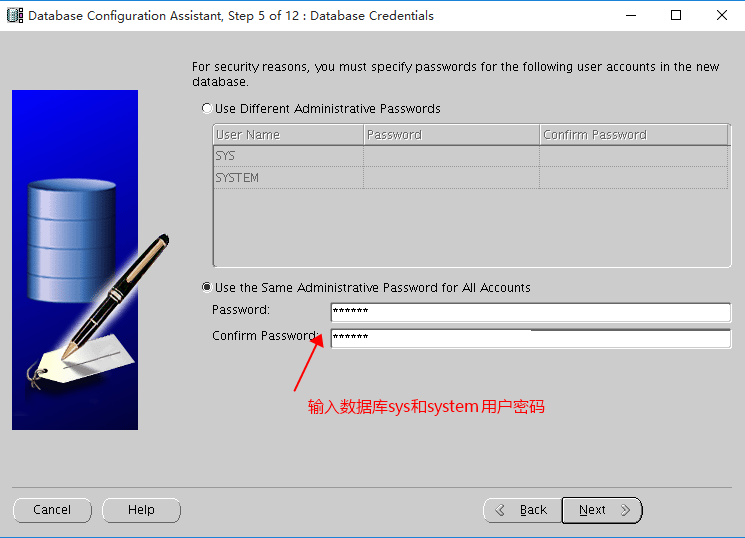
7.7 数据库密码
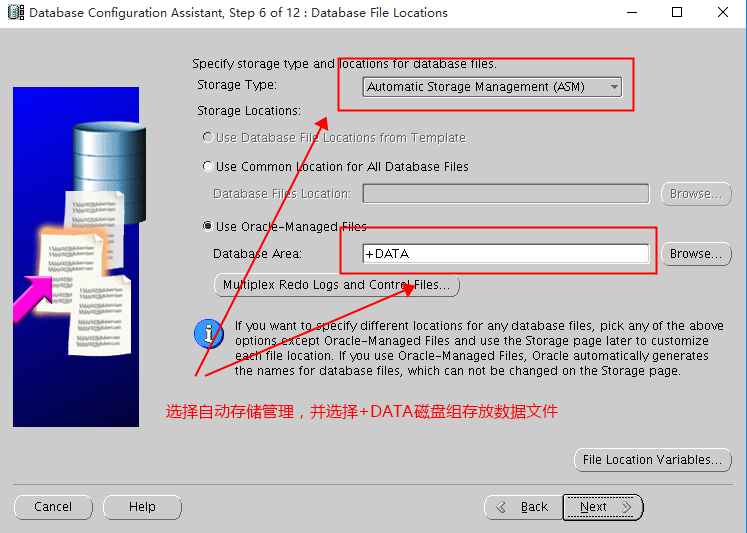
7.8 设置数据库文件存储位置
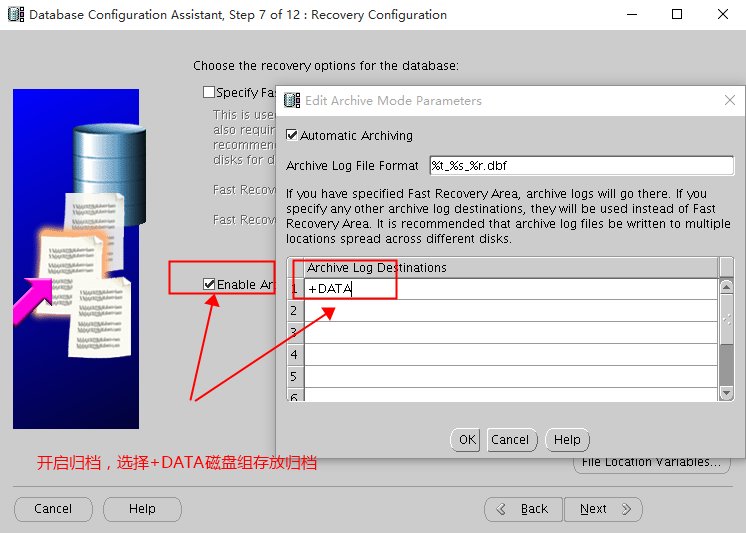
7.9 归档配置
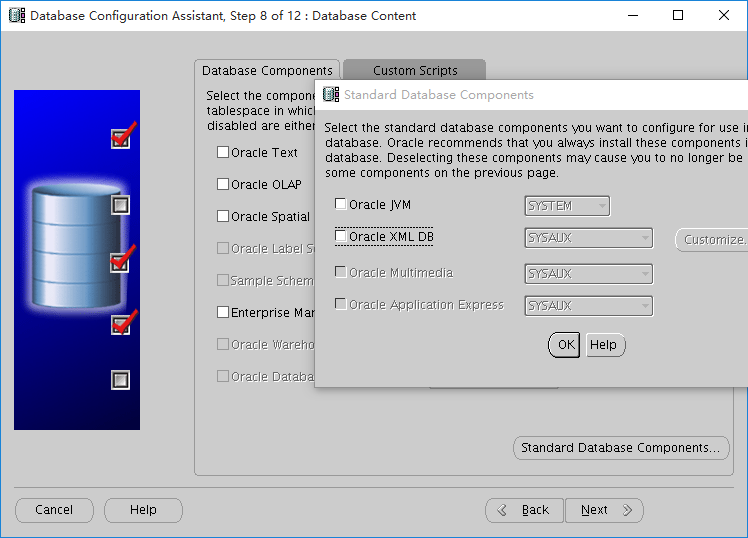
7.10 组建选择
取消选择没作用的组件
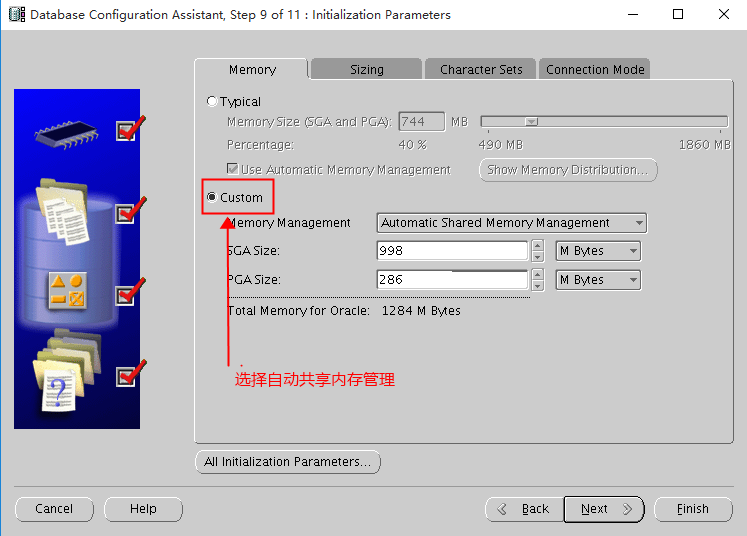
7.11 配置初始化参数
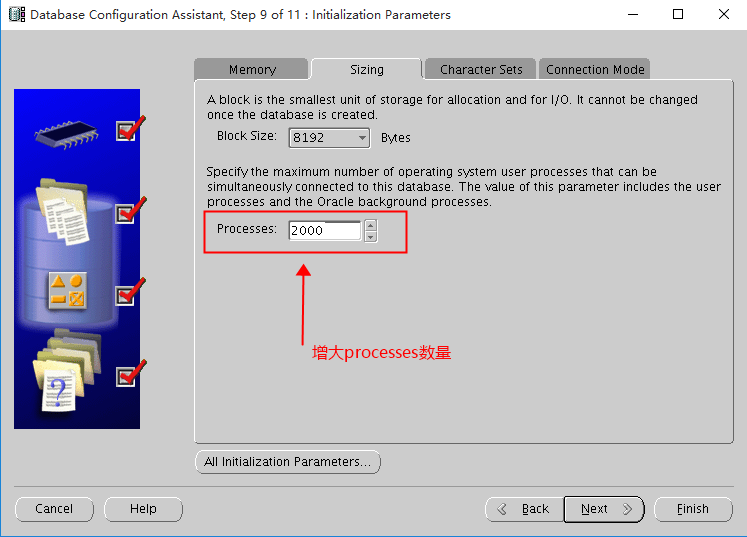
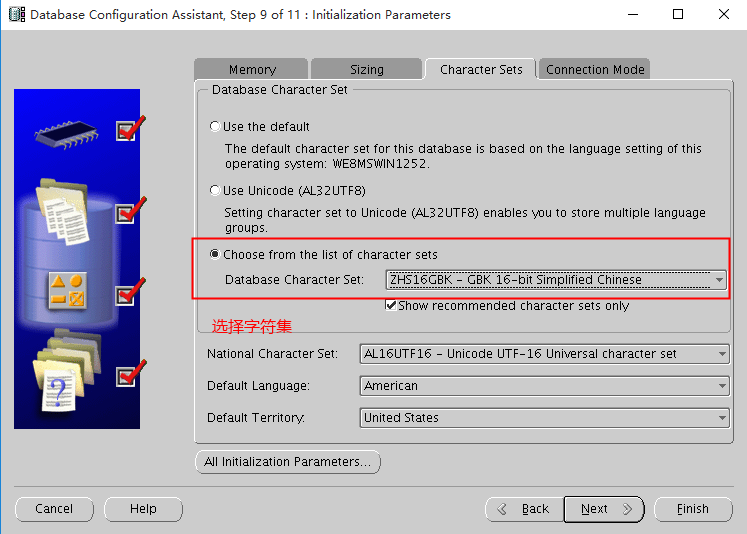
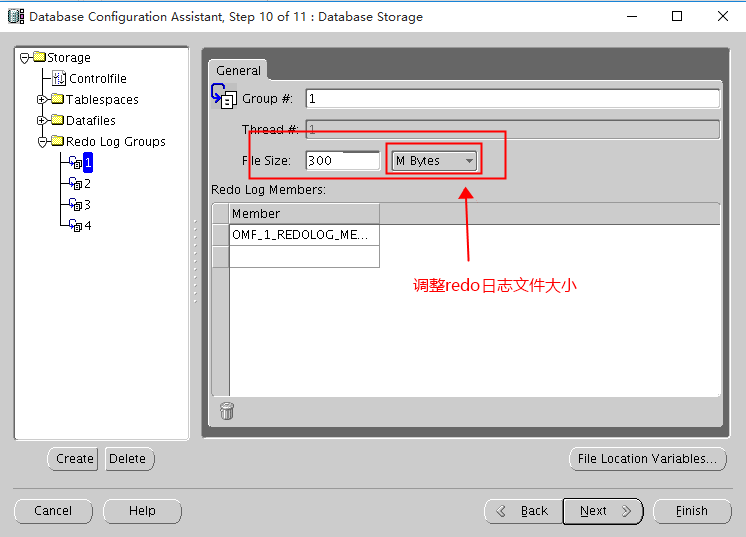
7.12 调整日志组大小
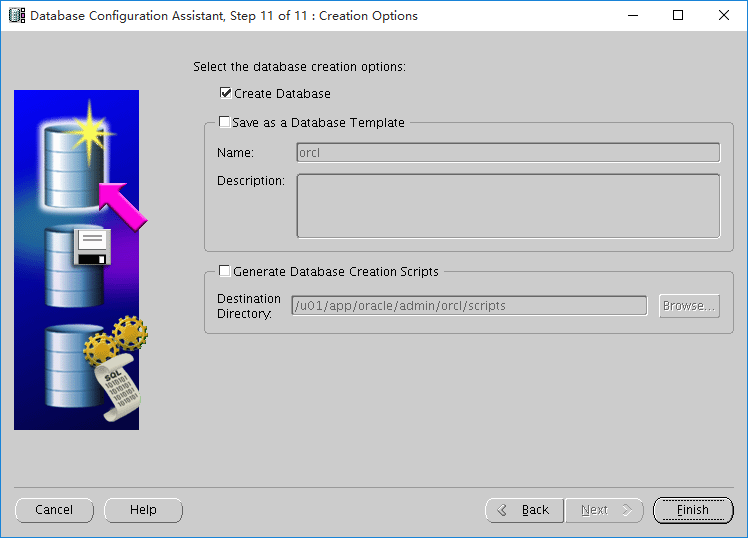
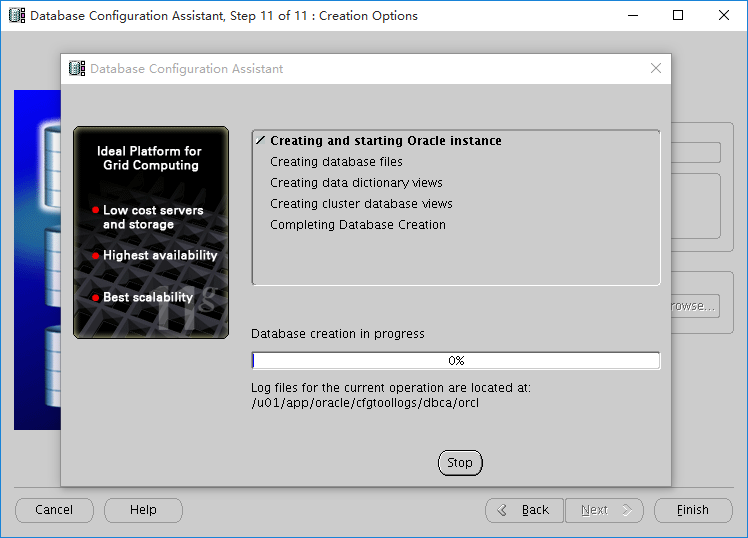
7.13 开始创建数据库
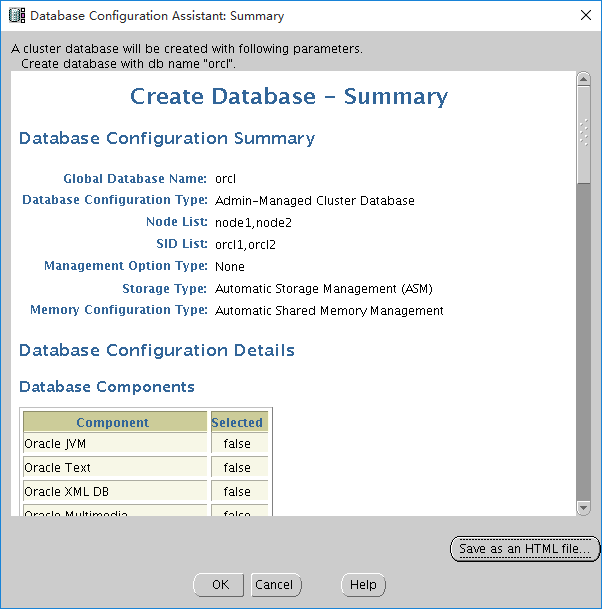
7.13 查看概要信息
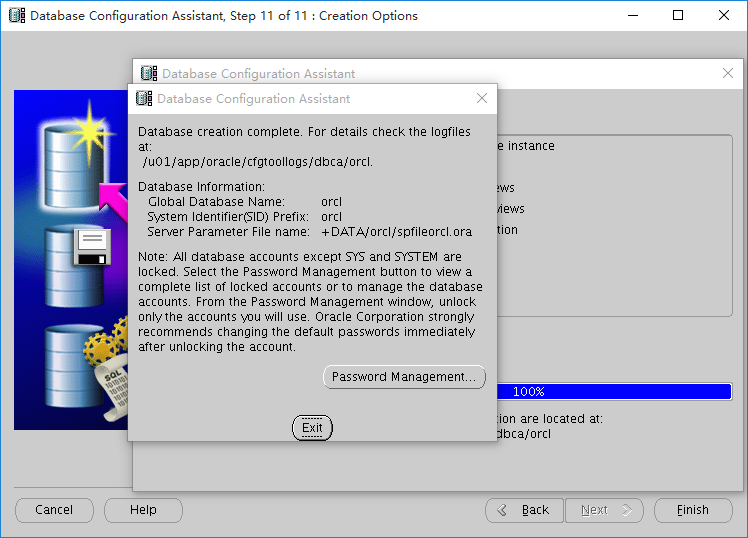
7.14数据库已经创建完毕
八 参数优化
8.1 数据库部分参数优化
8.1.1 密码策略
密码过期时间,从11g开始,oracle对数据库所有密码默认过期时间180天:
SQL> alter profile default limit PASSWORD_LIFE_TIME unlimited;密码登陆错误次数,对于输入错误密码导致数据库账号被锁定:
SQL> alter profile default limit FAILED_LOGIN_ATTEMPTS unlimited;密码大小写敏感,该参数默认值是TRUE,因此,默认情况下密码大小写是敏感的
SQL> alter system set SEC_CASE_SENSITIVE_LOGON=false sid='*';密码错误延迟登录,11G引入了延迟密码验证,在输入错误的密码后,后续如果还是采用错误的密码登陆,将会导致密码延迟验证,从第三次开始,后续的每次登陆导致密码延迟1秒左右
而且会导致失败登陆延长,可以通过如下事件来屏蔽密码的延迟验证
SQL> ALTER SYSTEM SET event='28401 TRACE NAME CONTEXT FOREVER, LEVEL 1' SCOPE=SPFILE SID='*';
8.1.2 审计策略
Oracle的审计从11g开始,默认为开启,建议关闭:
SQL> alter system set audit_trail=none sid='*';
8.1.3 CPU资源管理
关闭Resource Manager该特性为11g新特性,用来给特定的资源组分配指定的CPU配额,容易引起等待事件:RESMGR:cpu quantum,导致数据库响应慢。CPU耗尽
ALTER SYSTEM SET "_resource_manager_always_on"=FALSE SCOPE=SPFILE SID='*';
alter system set "_resource_manager_always_off"=true scope=spfile;

execute dbms_scheduler.set_attribute('SATURDAY_WINDOW','RESOURCE_PLAN','');
execute dbms_scheduler.set_attribute('SUNDAY_WINDOW','RESOURCE_PLAN','');
execute dbms_scheduler.set_attribute('MONDAY_WINDOW','RESOURCE_PLAN','');
execute dbms_scheduler.set_attribute('TUESDAY_WINDOW','RESOURCE_PLAN','');
execute dbms_scheduler.set_attribute('WEDNESDAY_WINDOW','RESOURCE_PLAN','');
execute dbms_scheduler.set_attribute('THURSDAY_WINDOW','RESOURCE_PLAN','');
execute dbms_scheduler.set_attribute('FRIDAY_WINDOW','RESOURCE_PLAN','');
8.1.4 关闭延迟段创建
ALTER SYSTEM SET deferred_segment_creation=FALSE SCOPE=SPFILE SID='*';8.1.5 关闭跨节点并行查询
ALTER SYSTEM SET parallel_force_local=TRUE SCOPE=BOTH; 8.1.6 直接路径读
对于大表,Oracle 11g倾向于直接路径读。如果AWR中,关于直接路径读的等待事件较高,可以考虑关闭该等待事件。
alter system set "_serial_direct_read"=never scope=spfile sid='*'8.2 内存参数优化
在64G主机内存的情况下,建议ORACLE内存设置如下:
| SGA | 25G |
|---|---|
| PGA | 5G |
| SHARED_POOL | 5G |
以上参数设置相对保守,可以自行决定具体参数设置范围,但是不能让SGA+PGA内存>60%OS_Mem 并且确保主机交换空间充足
8.3 在线日志调整
在线redo日志组建议,每个节点5组,每组一个日志文件,每个日志文件大小不小于400M(视具体业务情况而定),但是默认的4组每个节点2组 每组50M的默认设置明显是不够的
8.4 ASM部分参数优化
8.4.1 ASM 磁盘组兼容性
compatible参数(数据库的兼容版本)还确定启用的功能。该参数适用于数据库实例或ASM 实例,具体取决于instance_type参数。例如,将该参数设置为10.1 将禁止使用Oracle Database 11g 中引入的任何新功能(磁盘联机/脱机、可变区等)。
建或变更ASM 磁盘组时,可以使用CREATE DISKGROUP 命令或ALTER DISKGROUP命令新增的ATTRIBUTE 子句更改其属性。
alter diskgroup data SET ATTRIBUTE 'compatible.rdbms' = '11.2', 'compatible.asm' = '11.2'; 8.4.2 调整ASM内存参数
MEMORY_TARGET参数又基于PROCESSES参数相关连,有可能导致缺省配置不足,在内存充裕的情况下建议调整:
su - grid

sqlplus / as sysasm

SQL> alter system set memory_max_target=4096m scope=spfile;
SQL> alter system set memory_target=4096m scope=spfile;
8.5 禁用ACFS特性
目前发现ACFS会导致集群在关闭过程中无法停止ASM实例问题,如果确认不需要使用ACFS共享文件系统特性,建议还是关闭该新特性
2014-06-26 14:27:13.780: [ctssd(12910630)]CRS-2405:The Cluster Time Synchronization Service on host netpaydb01 is shutdown by user [client(9306254)]CRS-10001:26-Jun-14 14:27 ACFS-9290: Waiting for ASM to shutdown. [client(29753354)]CRS-10001:26-Jun-14 14:27 ACFS-9290: Waiting for ASM to shutdown. [client(12452012)]CRS-10001:26-Jun-14 14:27 ACFS-9290: Waiting for ASM to shutdown. [client(12910758)]CRS-10001:26-Jun-14 14:27 ACFS-9290: Waiting for ASM to shutdown. 关闭处理命令:
#./acfsroot disable CRS-2673: Attempting to stop 'ora.registry.acfs' on 'netpaydb02' CRS-2673: Attempting to stop 'ora.registry.acfs' on 'netpaydb01' CRS-2677: Stop of 'ora.registry.acfs' on 'netpaydb02' succeeded CRS-2677: Stop of 'ora.registry.acfs' on 'netpaydb02' succeeded ACFS-9374: Stopping ACFS registry resource succeeded. ACFS-9370: Deleting ACFS registry resource succeeded. ACFS-9378: Deleting ADVM/ACFS drivers resource succeeded.8.6 网络资源优化
11.2 RAC中Listener资源依赖于VIP, 而VIP资源依赖于ora.net1.network;这就造成了当public network短时不可用(或曰network hiccup)时会造成ora.net1.network资源OFFLINE,这就将造成该节点上VIP资源的FAILOVER和LISTENER的OFFLINE。且由于在11.2上ora.net1.network资源的默认CHECK_INTERVAL=1,即每秒都会对该NETWORK资源进行监控,所以NETWORK资源变得十分敏感,不管是由于硬件网络亦或者较高的主机负载造成短时的Public Network不可用,都可能导致VIP和LISTENER由于NETWORK依赖资源OFFLINE而受到影响
crsctl modify res ora.LISTENER.lsnr -attr "STOP_DEPENDENCIES=hard(intermediate:ora.net1.network)"

crsctl modify res ora.s2-11g.vip -attr "STOP_DEPENDENCIES=hard(intermediate:ora.net1.network)"

crsctl modify res ora.scan1.vip -attr "STOP_DEPENDENCIES=hard(intermediate:ora.net1.network)"
九 附录 RHEL(CentOS ) 7.X 上安装的不同之处
9.1 udev 绑定ASM磁盘方式有所变化
vi /etc/udev/rules.d/99-oracle-asmdevices.rules

KERNEL=="sd*5",SUBSYSTEM=="block",PROGRAM=="/usr/lib/udev/scsi_id --whitelisted --replace-whitespace --device=/dev/$parent",RESULT=="36000c29a364400fe7ffd53582b75641e",SYMLINK+="asm-ocr1",OWNER="grid",GROUP="asmadmin",MODE="0660"

KERNEL=="sd*6",SUBSYSTEM=="block",PROGRAM=="/usr/lib/udev/scsi_id --whitelisted --replace-whitespace --device=/dev/$parent",RESULT=="36000c29e8c134088fb10f86eca99b4dc",SYMLINK+="asm-ocr2",OWNER="grid",GROUP="asmadmin",MODE="0660"

KERNEL=="sd*7",SUBSYSTEM=="block",PROGRAM=="/usr/lib/udev/scsi_id --whitelisted --replace-whitespace --device=/dev/$parent",RESULT=="36000c29a364400fe7ffd53582b75641e",SYMLINK+="asm-ocr3",OWNER="grid",GROUP="asmadmin",MODE="0660"

KERNEL=="sd*8",SUBSYSTEM=="block",PROGRAM=="/usr/lib/udev/scsi_id --whitelisted --replace-whitespace --device=/dev/$parent",RESULT=="36000c29e8c134088fb10f86eca99b4dc",SYMLINK+="asm-data",OWNER="grid",GROUP="asmadmin",MODE="0660"
9.2 安装GI执行root.sh脚本时,ohasd 进程无法正常启动
ohasd failed to start
Failed to start the Clusterware. Last 20 lines of the alert log follow:
2018-04-19 09:54:30.897:
[client(19244)]CRS-2101:The OLR was formatted using version 3.
alert:
Oracle High Availability Service has timed out waiting for init.ohasd to be started.
因为Oracle Linux 7(和Redhat 7)使用systemd而不是initd来启动/重新启动进程,并将它们作为服务运行,所以当前的11.2.0.4和12.1.0.1的软件安装不会成功,因为ohasd进程没有正常启动。
解决方法: 手动在systemd中添加ohasd服务
(1).创建一个空服务文件:/usr/lib/systemd/system/ohasd.service
touch /usr/lib/systemd/system/ohasd.service(2).编辑文件ohasd.service添加如下内容
vi  /usr/lib/systemd/system/ohasd.service

[Unit]
Description=Oracle High Availability Services
After=syslog.target

[Service]
ExecStart=/etc/init.d/init.ohasd run >/dev/null 2>&1 Type=simple
Restart=always

[Install]
WantedBy=multi-user.target
(3).添加和启动服务
systemctl daemon-reload

systemctl enable ohasd.service

systemctl start ohasd.service
查看运行状态:
[root@rac1 system]# systemctl status ohasd.service

● ohasd.service - Oracle High Availability Services

Loaded: loaded (/usr/lib/systemd/system/ohasd.service; enabled; vendor preset: disabled)

Active: active (running) since Thu 2018-04-19 14:10:19 CST; 1h 16min ago

Main PID: 1210 (init.ohasd)

CGroup: /system.slice/ohasd.service

└─1210 /bin/sh /etc/init.d/init.ohasd run >/dev/null 2>&1 Type=simple

Apr 19 14:10:19 bms-75c8 systemd[1]: Started Oracle High Availability Services.

Apr 19 14:10:19 bms-75c8 systemd[1]: Starting Oracle High Availability Services...
(4).重新执行root.sh脚本
注意: 为了避免其余节点遇到这种报错,可以在root.sh执行过程中,待/etc/init.d/目录下生成了init.ohasd 文件后执行systemctl start ohasd.service 启动ohasd服务即可。若没有/etc/init.d/init.ohasd文件 systemctl start ohasd.service 则会启动
9.3 安装database软件时候会报错
Error in invoking target 'agent nmhs' of makefile '/u01/app/oracle/product/11.2.0/db_1/sysman/lib/ins_emagent.mk'

解决方法:

编辑文件 $ORACLE_HOME/sysman/lib/ins_emagent.mk
vi /u01/app/oracle/product/11.2.0/db_1/sysman/lib/ins_emagent.mk

找到 $(MK_EMAGENT_NMECTL) 这一行,在后面添加 -lnnz11 如下:
$(MK_EMAGENT_NMECTL) -lnnz11

然后点击retry 即可