在 Docker 容器里放大型 JAR 包是对存储空间、网络带宽和时间的一种浪费。所幸的是,我们可以利用 Docker 镜像的分层机制和注册表缓存来创建增量式的小工件,甚至可以将一个工件的大小从 75MB 减到 1MB。值得一提的是,现在有一个 Maven 和 Gradle 插件可以处理这些事情。
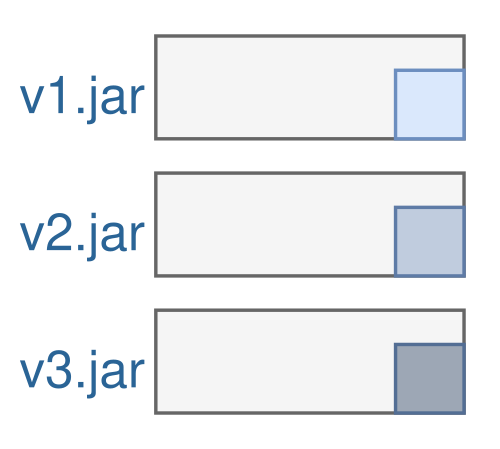
问题:大型 JAR 包里的依赖项
Docker 镜像的分层机制非常强大。如果你所有的应用程序都使用了相同的基础镜像(比如 openjdk:11.0.4-jre-slim),Docker 重用了 OS 和 JRE 的一些层,这样就可以节省 Docker 注册表的存储空间,上传和下载镜像的速度也更快了,因为只需要传输更少的文件量(Docker 只会将新的层传输到注册表中)。
可惜的是,很多应用程序并没有很好地利用这个强大的机制,因为他们把大型的 JAR 包塞进了 Docker 镜像里。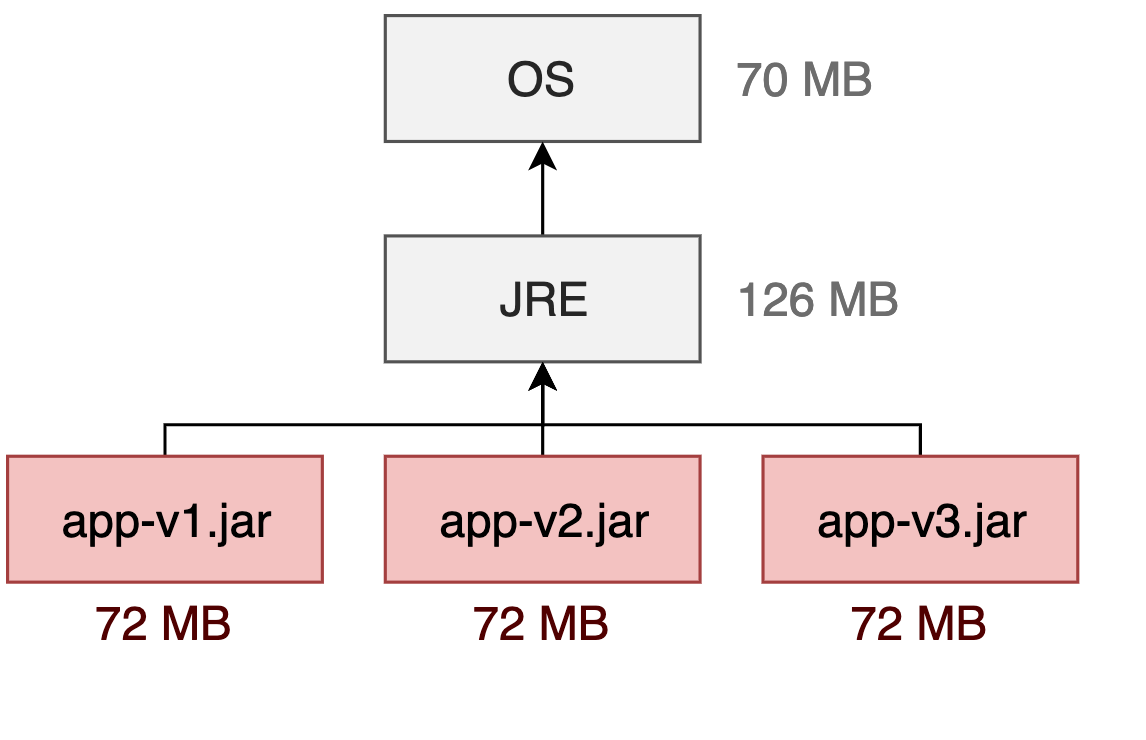
我们假设将一个 Spring Boot 应用程序打成一个大型的 JAR 包。这个 JAR 包有 72MB,并在 Dockerfile 的最后一行将它加到镜像里。也就是说,每个新版本都需要 72MB 的存储空间,而且要上传到注册表中,或则从注册表中下载下来。
现在来看一下这个 72MB 的镜像: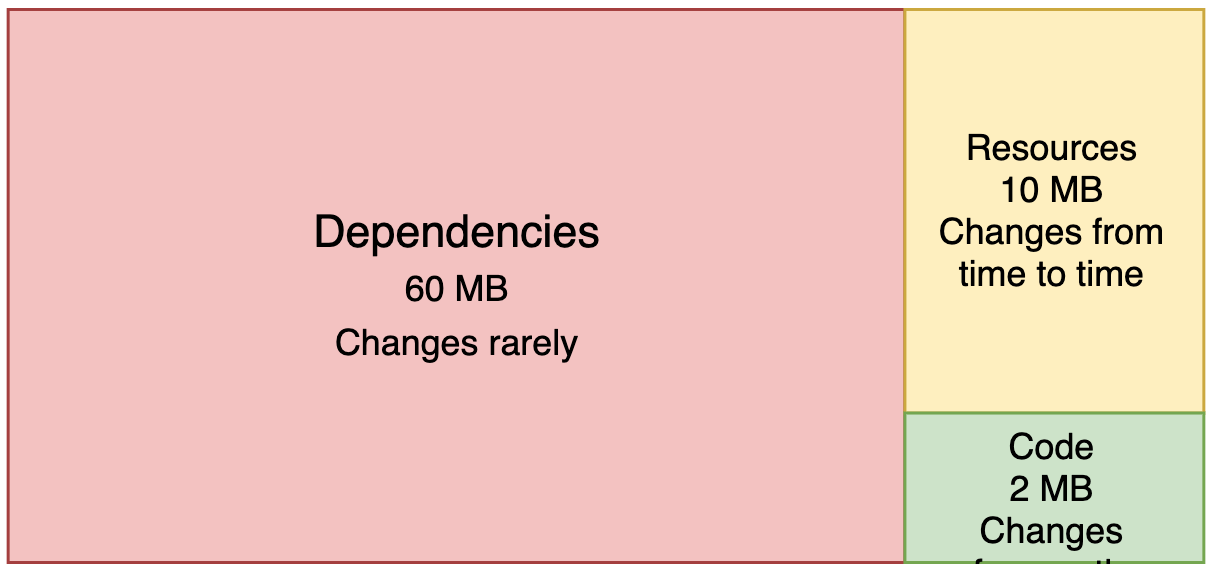
一个大型的 JAR 包包含三个部分:
- 依赖项:它们占了很大的一部分比例,但很少发生改动。大多数时候我们只会修改我们的代码,很少会去修改依赖项。但依赖项每次都会被拷贝到发布版本中。
- 资源文件:这个问题跟依赖项差不多。虽然资源文件(HTML、CSS、图像、配置文件,等等)比依赖项更经常发生改动,但比起代码还是相对少一些。它们也会被拷贝到发布版本中。
- 代码:代码只占 JAR 包很小的一部分(通常 300KB 到 2MB),但会经常发生改动。
经常发生改动的代码只有几 MB,但每次都需要拷贝所有的依赖项和资源文件,这是对存储空间、带宽和时间的一种浪费。
如果需要为每个 git 提交创建一个可部署的镜像,那浪费的空间就更多了。持续交付可能需要这么做,但这样做浪费了大量的空间,因为每一次提交都会占用额外的 72MB 空间。
有哪些有用的工具可用来分析 Docker 镜像和可视化大型 JAR 对 Docker 镜像的影响?是 dive 和 docker history。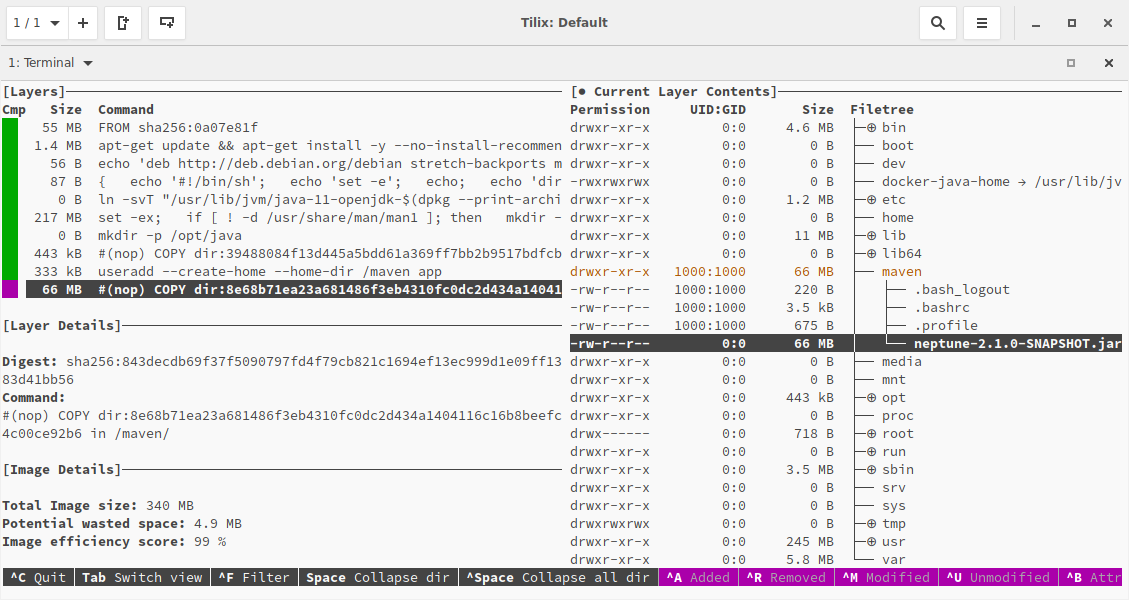
docker history 命令也可以用来显示 JAR 包层:
~ ❯❯❯ docker history registry.domain.com/neptune:latest
IMAGE           CREATED          CREATED BY                     SIZE
44e77fa110e5    2 minutes ago    /bin/sh -c #(nop) COPY dir:…   65.5MB
...
<missing>       8 months ago     /bin/sh -c set -ex;   if [ …   217MB
...
<missing>       8 months ago     /bin/sh -c #(nop) ADD file:…   55.3MB
解决方案:依赖项、资源文件和代码放在不同的层
所幸的是,我们可以利用 Docker 镜像的分层机制,就像已经分好的 OS 和 JRE 层那样。我们更进一步,引入了依赖项层、资源文件层和代码层。我们还按照改动的频繁程度来安排这些层的次序。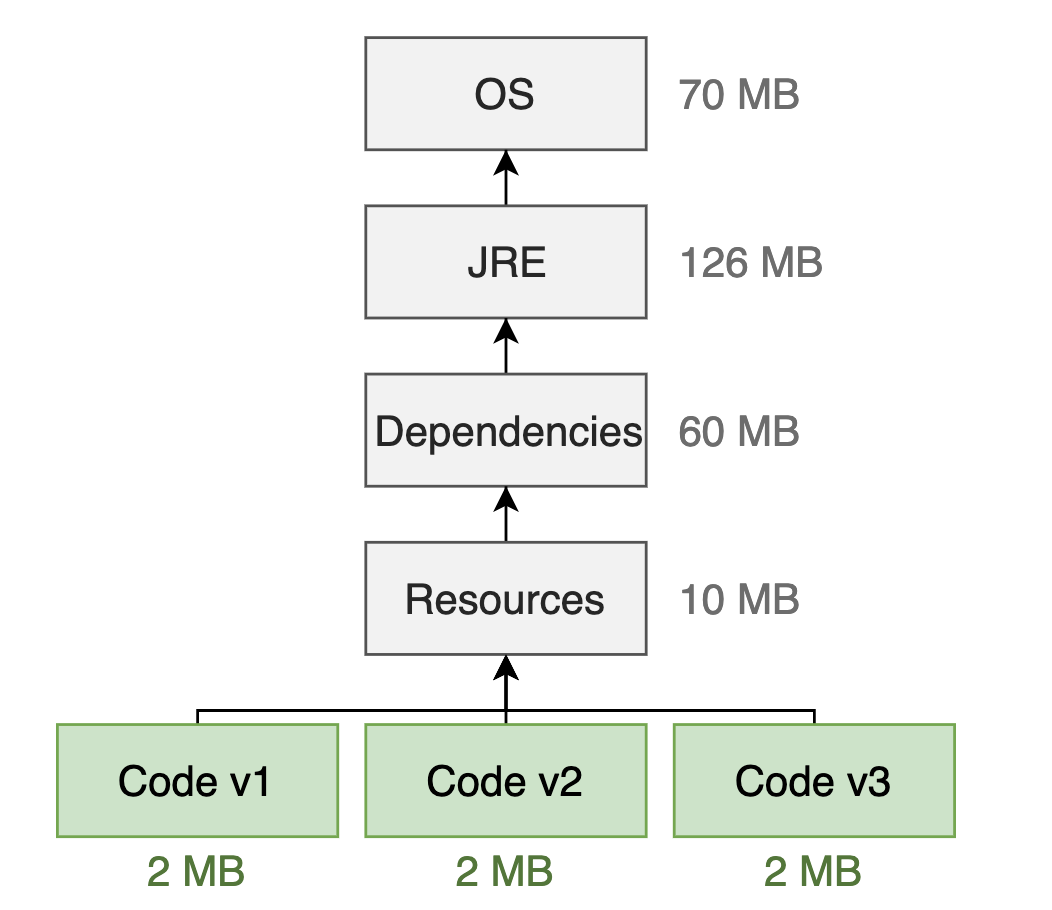
现在,如果新版本只包含代码层的改动,就只需要 2MB 的存储空间,因为我们可以重用依赖项层和资源层。它们在注册表中已经有了,不需要再次上传。
谷歌的 Jib 插件
实际上,我们不需要手动编写 Dockerfile,我们可以使用谷歌的 Jib 插件。Jib 是一个 Maven 或 Gradle 插件,用于简化 Java 应用程序镜像的打包过程。对于我们来说,Jib 最重要的一个特性是,它会扫描我们的 Java 项目,并为依赖项、资源文件和代码创建不同的层。
使用步骤:
1.在 pom.xml 中添加插件配置:
<plugin>
    <groupId>com.google.cloud.tools</groupId>
    <artifactId>jib-maven-plugin</artifactId>
    <version>1.6.1</version>
    <configuration>
        <from>
            <image>openjdk:11.0.4-jre-slim</image>
        </from>
        <to>
            <image>domain.com/${project.artifactId}:latest</image>
            <!-- optional: create a tag based on the git commit id (via the git-commit-id plugin): -->
            <tags>
                <tag>${git.commit.id}</tag>
            </tags>
        </to>
        <container>
            <jvmFlags>
                <jvmFlag>-server</jvmFlag>
            </jvmFlags>
        </container>
    </configuration>
    <executions>
        <execution>
            <id>build-and-push-docker-image</id>
            <phase>package</phase>
            <goals>
                <goal>build</goal>
            </goals>
        </execution>
    </executions>
</plugin>
2.使用mvn命令打包
# execute the whole build lifecycle and push the image to the registry
mvn package

# only create and push the image.
mvn jib:build
# Note that `jib:build` is daemonless and won't create the image on your machine.
# It talks directly to the registry. Use `docker pull` to fetch the created image.

# only create and push the image via the Docker daemon.
mvn jib:dockerBuild
2.使用 dive 和 docker history 显示层结构。
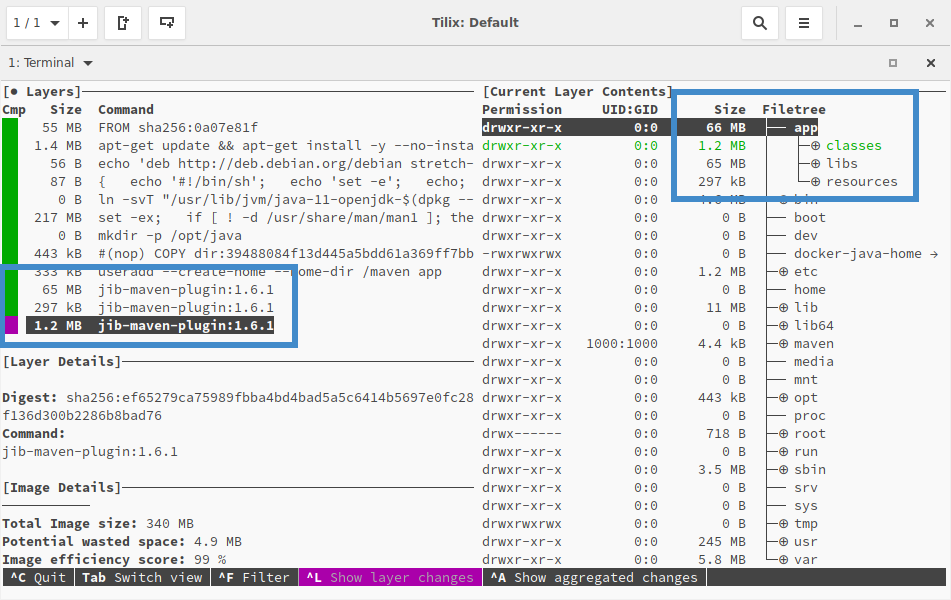
~ ❯❯❯ docker history registry.domain.com/neptune:latest
IMAGE          CREATED         CREATED BY                SIZE     COMMENT
a759771eb008   49 years ago    jib-maven-plugin:1.6.1    1.22MB   classes
<missing>      49 years ago    jib-maven-plugin:1.6.1    297kB    resources
<missing>      49 years ago    jib-maven-plugin:1.6.1    64.6MB   dependencies
...
<missing>      8 months ago    /bin/sh -c set -ex; ...   217MB
...
<missing>      8 months ago    /bin/sh -c #(nop) ADD...  55.3MB
清理(可选)
禁用 maven-deploy-plugin、maven-install-plugin 和 maven-jar-plugin。这些步骤不需要了,即使程序员敲入 mvn deploy 也不会执行这些步骤。
<plugin> <groupId>org.apache.maven.plugins</groupId> <artifactId>maven-deploy-plugin</artifactId> <configuration> <skip>true</skip> </configuration> </plugin> <plugin> <groupId>org.apache.maven.plugins</groupId> <artifactId>maven-install-plugin</artifactId> <configuration> <skip>true</skip> </configuration> </plugin> <plugin> <groupId>org.apache.maven.plugins</groupId> <artifactId>maven-jar-plugin</artifactId> <!-- Unfortunately, the skip flag is not supported. Workaround: Bind the default-jar execution to a nonexistent phase. --> <executions> <execution> <id>default-jar</id> <phase>none</phase> </execution> </executions> </plugin>- 如果使用了 Spring Boot,可以移除 spring-boot-maven-plugin,现在不再需要创建大型 JAR 包了。
使用部署配置
我们可以在 pom.xml 中配置 Jib 的 JVM 和程序参数,但通常不会这么做。相反,我们会根据部署环境(比如本地环境、QA 环境、生产环境)来配置这些参数。我们通过这种方式来配置 Spring 参数和 JVM 堆大小。
- JVM 参数:我们使用环境变量 JAVA_TOOL_OPTIONS 来添加 JVM 参数,比如堆大小。
Spring 配置:我们将外部配置文件挂载到 Docker 容器,并将它的路径作为一个程序参数传递给命令行。当然,你也可以使用环境变量。
docker run -p 1309:1309 --net=host \
  -e JAVA_TOOL_OPTIONS='-Xms1000M -Xmx1000M' \
  -v /home/phauer/dev/app/app-config.yml:/app-config.yml \
  registry.domain.com/app:latest \
  --spring.config.additional-location=/app-config.yml
